The Basics
- What is JasperWho?
- Our Vision
- Installing JasperWho?
- Configuration and data models
- Meet the frontend
- Meet the API
- Try it out
- Open Source Attribution
- Get JasperWho?
What is JasperWho?
JasperWho? is a web application that lets you manage and render JasperReports templates — via a clean frontend, a powerful REST API, or both. It turns the well-established but notoriously Java-heavy JasperReports engine into something any application can consume with a single HTTP call.
The Problem It Solves
JasperReports is a mature, battle-tested report engine. It produces high-quality PDFs, supports complex layouts, barcodes, images, and dynamic data — and it has been doing so reliably for decades. The catch: it is a Java library. Using it directly means running a JVM, managing a Java stack, and writing Java code to drive it. For teams working in PHP, Python, C#, or any other ecosystem, that is a significant barrier.
JasperWho? removes that barrier entirely. Its render engine is built in pure PHP — no JVM process, no Java runtime on the server, nothing. You design your report templates in Jaspersoft Studio as usual, upload them once, and from that point on — rendering is just a POST request.
POST /api/v1/report-config/A5_KanBan/render
Content-Type: application/json
Authorization: Bearer <token>

{
  "outputType": "base64",
  "parameters": { "P_ARTICLE_NUMBER": "4561287-154" },
  "data": [...],
  "createHistoryRecord": true
}
That is the entire integration. No Java, no JVM, no Jaspersoft Server license.
Where It Came From
JasperWho? was built by someone with a logistics and IT background who needed a simple, reliable way to generate article labels on demand — from whatever system was running at the time, without caring about the underlying report engine. The original idea was modest: a small API wrapper around JasperReports, nothing more.
It grew. A frontend to manage templates. Connection configs for live SQL data. History records for traceability. Print task dispatching. A permission system. What started as "just get me a label PDF" is now a full suite — and the name stuck, question mark and all.
What JasperWho? Does
At its core, JasperWho? does four things:
Manages report templates. You upload .jrxml files, and JasperWho? analyses them automatically — detecting parameters, data fields, and image resources. Everything is stored, versioned, and ready to render.
Connects to your data. JasperWho? can execute SQL queries against live databases at render time. MySQL, MariaDB, PostgreSQL, and SQL Server are all supported. No live connection needed either — you can deliver data directly in the render request as a JSON array, which makes it equally useful for applications that already have the data in memory.
Renders on demand. A single API call produces a PDF. You choose the output format — Base64-encoded inline, a file URL, or silent output for print-only flows. Rendering is synchronous and fast.
Dispatches print jobs. Rendered PDFs can be forwarded directly to a print service via WebSocket, creating a traceable ReportPrintTask with status tracking. Labels off the printer, not just on the screen.
Who It Is For
JasperWho? is for anyone who needs to generate documents — labels, reports, delivery notes, production sheets, certificates — reliably and programmatically. The typical home is in logistics, production, and warehousing, where printing article labels, kanban cards, or shipment documents is a daily operational need and downtime is not an option.
More broadly: if your application needs to produce a PDF from structured data, and you do not want to build and maintain a report engine yourself, JasperWho? is the answer.
Deployment
JasperWho? is a standard Laravel application. It runs wherever PHP runs — which is nearly everywhere.
| Scenario | Works? |
|---|---|
| Cloud VM or VPS | Yes |
| On-premise server | Yes |
| Docker container | Yes |
| Raspberry Pi on the shop floor | Yes |
| Jaspersoft Server | Not needed |
The setup is intentionally slim. PHP, a database for JasperWho? itself, and the JasperPHP render engine — that is the stack. No application server, no JVM process to manage, no separate Jaspersoft infrastructure. JasperWho? bundles everything it needs.
Login: demo@jasper.who · Password: demo
Our Vision
JasperWho? exists because good software should not be complicated, expensive, or opaque. This page explains what we are building towards and how we think about working with the people who use it.
Simple by Design
The goal behind JasperWho? has always been the same: take a powerful but complex technology and make it accessible to teams who just need it to work. Not teams with a dedicated Java architect. Not teams with a six-figure infrastructure budget. Teams with a problem to solve and a deadline to meet.
That philosophy shapes every decision in JasperWho? — from the API design to the frontend workflows. Concepts should be easy to grasp. Setup should be fast. Day-to-day use should feel obvious, even for someone who has never heard of JasperReports.
Reliable and Performant
Simple does not mean limited. JasperWho? is designed to handle real production workloads — in logistics, on the shop floor, in warehouses where a label printer needs to respond in milliseconds and cannot afford to fail during a shift.
The architecture reflects this. The stack is intentionally slim — no unnecessary layers, no bloat. Rendering is synchronous and fast. The application runs comfortably on modest hardware, including single-board computers deployed directly in production environments.
When JasperWho? is running, it runs. That is the expectation we build to.
No Lock-In
JasperWho? is built exclusively on open-source components. There is no proprietary cloud dependency, no mandatory subscription, no remote kill switch. You run it where you want — on your own server, in your own cloud account, on a machine on your shop floor — and it stays yours.
The report templates you design in Jaspersoft Studio are standard .jrxml files. The database you connect to is your own. The PDFs it produces belong to you. JasperWho? is infrastructure you own and control, not a service you rent.
Grows With You
Most customers start with a single, focused use case — generating an article label, a delivery note, a production sheet. JasperWho? handles that out of the box. But as requirements evolve, the platform grows with them.
History records for traceability. Print task dispatching via WebSocket. Multi-report management with a structured permission system. API access for any system that can make an HTTP call. None of these need to be in scope on day one — but they are all there when the time comes.
Beyond the built-in capabilities, JasperWho? is extended on request. If a workflow requires something specific, it can be built in. Licenses include continued development and updates — the software does not freeze at the point of purchase.
A Real Partner
JasperWho? is not sold by a faceless vendor with a tiered support portal. It is built and maintained by someone with deep hands-on experience in logistics IT, system integration, and shop floor environments — and that experience is available directly to every customer.
This means practical help where it matters: rolling out the application, connecting it to existing ERP or WMS systems, adapting report templates to operational realities, and making sure the implementation actually works in the environment it needs to run in — not just in a demo.
The goal is not a one-time sale. It is a long-term working relationship with customers who have real problems and need a partner who understands them.
The Full Picture
To put it plainly: JasperWho? is powerful software at a reasonable price, built on open foundations, designed to be simple to operate, and backed by someone who will pick up the phone.
If that sounds like what you need — welcome.
Installing JasperWho?
JasperWho? is a standard Laravel application. The setup is intentionally slim — pull the repository, install dependencies, configure the environment, migrate the database. A standard installation is up and running in under 30 minutes.
What You Don't Need
Before listing what is required, it is worth being explicit about what is not:
- No Java — the render engine is pure PHP. No JVM, no Java runtime, no Java SQL drivers.
- No Node.js / npm / Vite — the frontend assets are pre-built and bundled with the repository.
- No Jaspersoft Server — JasperWho? is entirely self-contained.
- No Docker — optional for the database only, not required for the application itself.
System Requirements
| Requirement | Notes |
|---|---|
| PHP >= 8.2 | Required extensions: ctype, curl, fileinfo, filter, hash, mbstring, openssl, pcntl, pdo, pdo_sqlite, posix, session, simplexml, tokenizer. For report database connections, additionally: pdo_mysql (MySQL / MariaDB), pdo_pgsql (PostgreSQL). SQL Server is listed separately below. |
| Composer | PHP dependency manager — getcomposer.org |
| MySQL or MariaDB | JasperWho?'s own application database. A Docker container works fine if no local instance is available. |
| poppler-utils | Provides pdftoppm, used for generating report thumbnails. Install via apt install poppler-utils. |
| Supervisor | Keeps the Laravel queue worker running for background jobs (thumbnail generation, purge tasks). |
| Apache2 or nginx | Optional reverse proxy. Not required for local or development setups. |
| php-sqlsrv / pdo_sqlsrv | Only required when connecting to Microsoft SQL Server as a report data source. Not needed otherwise. |
Bundled Dependencies
The following components are bundled with JasperWho? — no separate installation required:
| Component | Purpose |
|---|---|
| JasperPHP | Pure PHP render engine — parses .jrxml and generates PDFs via TCPDF. Installed automatically by Composer. |
| Log Viewer | In-browser Laravel log viewer for monitoring application logs. |
| Scribe | Generates the interactive API documentation from source annotations. |
| Material Design Icons | Icon set used throughout the frontend. |
| Ace Editor | In-browser code editor for writing SQL queries. |
| Logo & Color Concept | Visual identity by sinister-labs. |
| Jaspersoft Studio 6.21.5 | Desktop IDE for designing .jrxml report templates. Installed separately on the designer's machine — not on the server. Download here. |
Deployment Options
JasperWho? can be deployed in two ways: self-hosted on your own infrastructure, or fully managed and operated by kiwi software. Both options deliver identical functionality — the choice depends on your team's operational preferences and existing infrastructure.
Self-Hosted
You run JasperWho? on your own servers. The infrastructure footprint is intentionally small — no Java runtime, no application server, no container orchestration required. A single modest Linux VPS covers all but the most demanding workloads.
| Component | Minimum | Recommended | Notes |
|---|---|---|---|
| JasperWho? server (Linux) | 1 vCPU, 1 GB RAM | 2 vCPU, 4 GB RAM | A Hetzner CX22 (2 vCPU, 4 GB RAM, 40 GB NVMe) is more than sufficient for most deployments. Any comparable entry-level VPS or on-premises Linux server works equally well. |
| Disk | 10 GB | 40 GB | Application and report thumbnails. Scale with report volume and history retention period. |
| Background Printing Service (Windows) | Any Windows 10/11 machine or Windows Server with the target printers installed | Runs as a lightweight console process — a few dozen MB of memory, negligible CPU. In most deployments, an existing Windows PC on the shop floor or in the office serves as the print host. No dedicated hardware required. | |
Managed Hosting
If you prefer not to manage infrastructure yourself, JasperWho? can be hosted and operated for you. Instances run exclusively in Germany on Hetzner hardware — reliable, fast, and GDPR-compliant by location. Updates, monitoring, and backups are handled on your behalf.
Managed hosting works well for most use cases. Depending on your network connection to the hosting location, render requests may see slightly higher latency compared to a locally deployed instance — typically not noticeable, but worth considering for high-frequency, latency-sensitive workloads such as real-time label printing on the shop floor.
For managed hosting enquiries, get in touch directly.
Configuration and data models
JasperWho? is built around a small set of interconnected models. Understanding them is the key to understanding everything else — from how reports are set up, to how renderings are stored, to how print jobs are dispatched.
Field Naming Conventions
JasperWho? uses two naming styles consistently throughout the system. Database columns and Laravel model attributes are always snake_case — for example broadcast_id, report_config_id, created_by_token_id. The API and frontend use camelCase for all request and response fields — the same fields become broadcastId, reportConfigId, createdByTokenId.
This split is consistent without exception: whenever you are working with the API or the frontend, use camelCase. Whenever you are looking at raw database records, migration files, or server-side model attributes, expect snake_case. Throughout this documentation, all field names and JSON examples follow the API convention — camelCase.
The Model Hierarchy
Every piece of data in JasperWho? fits into a clear hierarchy. At the top sits the ReportConfig — the central entity. Everything else either belongs to it, describes it, or records what happened when it was used.
ReportContext                   ← Organisational label for grouping reports
ReportConnectionConfig          ← Optional live database connection
ReportConfig                    ← The report template + all its metadata
  ├── ReportParameter           ← Input values passed at render time
  ├── ReportField               ← Output columns from the SQL query or data payload
  └── ReportResource            ← Graphic file asset (image, logo)
        └── (links to) CommonReportResource   ← Shared asset reused across reports
ReportHistoryRecord             ← Record of a past rendering (optional)
  └── ReportPrintTask           ← A print job dispatched from a history record
ReportContext
A context is a visual label you assign to report configurations to group and identify them at a glance. It carries no functional logic — it is purely organisational.
| Field | Description |
|---|---|
context_name |
Display name of the context |
context_description |
Short description |
context_text_color |
Hex color for the label text |
context_badge_color |
Hex color for the badge background |
context_border_color |
Hex color for the badge border |
Every ReportConfig requires a context. A single context can be shared across any number of report configurations.
ReportConnectionConfig
A connection config represents a live database connection that JasperWho? can use as a data source when rendering a report. When assigned to a ReportConfig, JasperWho? executes the report's SQL query against this connection at render time and feeds the result rows into the report as field data.
| Field | Description |
|---|---|
connection_name |
Friendly name for this connection |
connection_driver |
Database driver (see table below) |
connection_host |
IP address of the database server |
connection_port |
Port — required |
connection_database |
Database / schema name |
connection_username |
Username (stored encrypted) |
connection_password |
Password (stored encrypted) |
connection_test_query |
SQL query used to verify the connection |
connection_tested |
Whether the connection has been successfully tested |
Supported drivers:
| Driver | Database |
|---|---|
mysql |
MySQL |
mariadb |
MariaDB |
pgsql |
PostgreSQL |
sqlsrv |
Microsoft SQL Server |
Connection status is derived from connection_tested:
| Status | Meaning |
|---|---|
| approved | Connection has been tested successfully |
| unapproved | Never tested or last test failed |
Network Requirements
JasperWho? establishes the database connection directly from the server it runs on. The target database must therefore be reachable from that host — ideally within the same network or at minimum via a secured private channel.
When is a ReportConnectionConfig needed?
A ReportConnectionConfig is optional per ReportConfig. Whether you need one depends on how your report gets its data:
| Scenario | Connection needed? |
|---|---|
| Report has no detail band — purely static layout | No |
| Report has a detail band, data delivered via API at render time | No |
| Report has a detail band and fetches data via SQL | Yes |
ReportConfig
The ReportConfig is the core entity of JasperWho?. It represents a single JasperReports template — the .jrxml file — together with all the metadata JasperWho? maintains about it.
| Field | Description |
|---|---|
report_name |
Display name of the report |
report_description |
Optional description |
report_file_name |
Internal filename of the stored .jrxml |
report_width |
Page width in mm (extracted from the .jrxml on upload) |
report_height |
Page height in mm (extracted from the .jrxml on upload) |
report_query |
SQL query — defined in JasperWho? and stored in the database |
report_has_detail_band |
Whether the template contains a detail band (extracted on upload) |
report_context_id |
FK → ReportContext |
report_connection_config_id |
FK → ReportConnectionConfig (nullable) |
report_preview_base64 |
Base64-encoded preview image |
report_thumbnail_base64 |
Base64-encoded thumbnail image |
.jrxml file. It is written and managed directly in JasperWho? and stored in the database as part of the ReportConfig. The .jrxml only defines which fields the query result maps to.
When a .jrxml file is uploaded, JasperWho? automatically analyses it and creates the associated ReportParameter, ReportField, and ReportResource records. You then review and complete the auto-generated data — for example setting example values or uploading resource files.
ReportParameter
Parameters are the inputs passed into a report at render time — dates, IDs, filter values, flags, and so on.
| Field | Description |
|---|---|
parameter_name |
Parameter name as defined in the .jrxml |
parameter_data_type |
Java class name (e.g. java.lang.String, java.lang.Integer) |
parameter_required |
Read from the required custom property in the .jrxml |
parameter_evaluation |
Evaluation time, extracted from the .jrxml |
parameter_example_value |
Read from the exampleValue custom property in the .jrxml |
Both parameter_required and parameter_example_value are sourced from custom properties embedded in the .jrxml parameter definition. They can also be set manually in JasperWho? after upload.
ReportField
Fields represent the data columns that populate the report's detail band — either from an SQL query result or from a data array delivered at render time.
| Field | Description |
|---|---|
field_name |
Field name as defined in the .jrxml |
field_data_type |
Java class name (e.g. java.lang.String, java.math.BigDecimal) |
field_example_value |
Read from the exampleValue custom property in the .jrxml |
field_example_value is used when rendering a preview without a live database connection.
ReportResource
Resources are graphic file assets — images and logos — embedded in the report template. They are referenced in the .jrxml via parameters following the P_RESOURCE_ naming convention.
| Field | Description |
|---|---|
parameter_name |
The P_RESOURCE_ parameter name as referenced in the .jrxml |
resource_file_name |
Filename of the directly uploaded file (nullable) |
common_report_resource_id |
FK → CommonReportResource (nullable) |
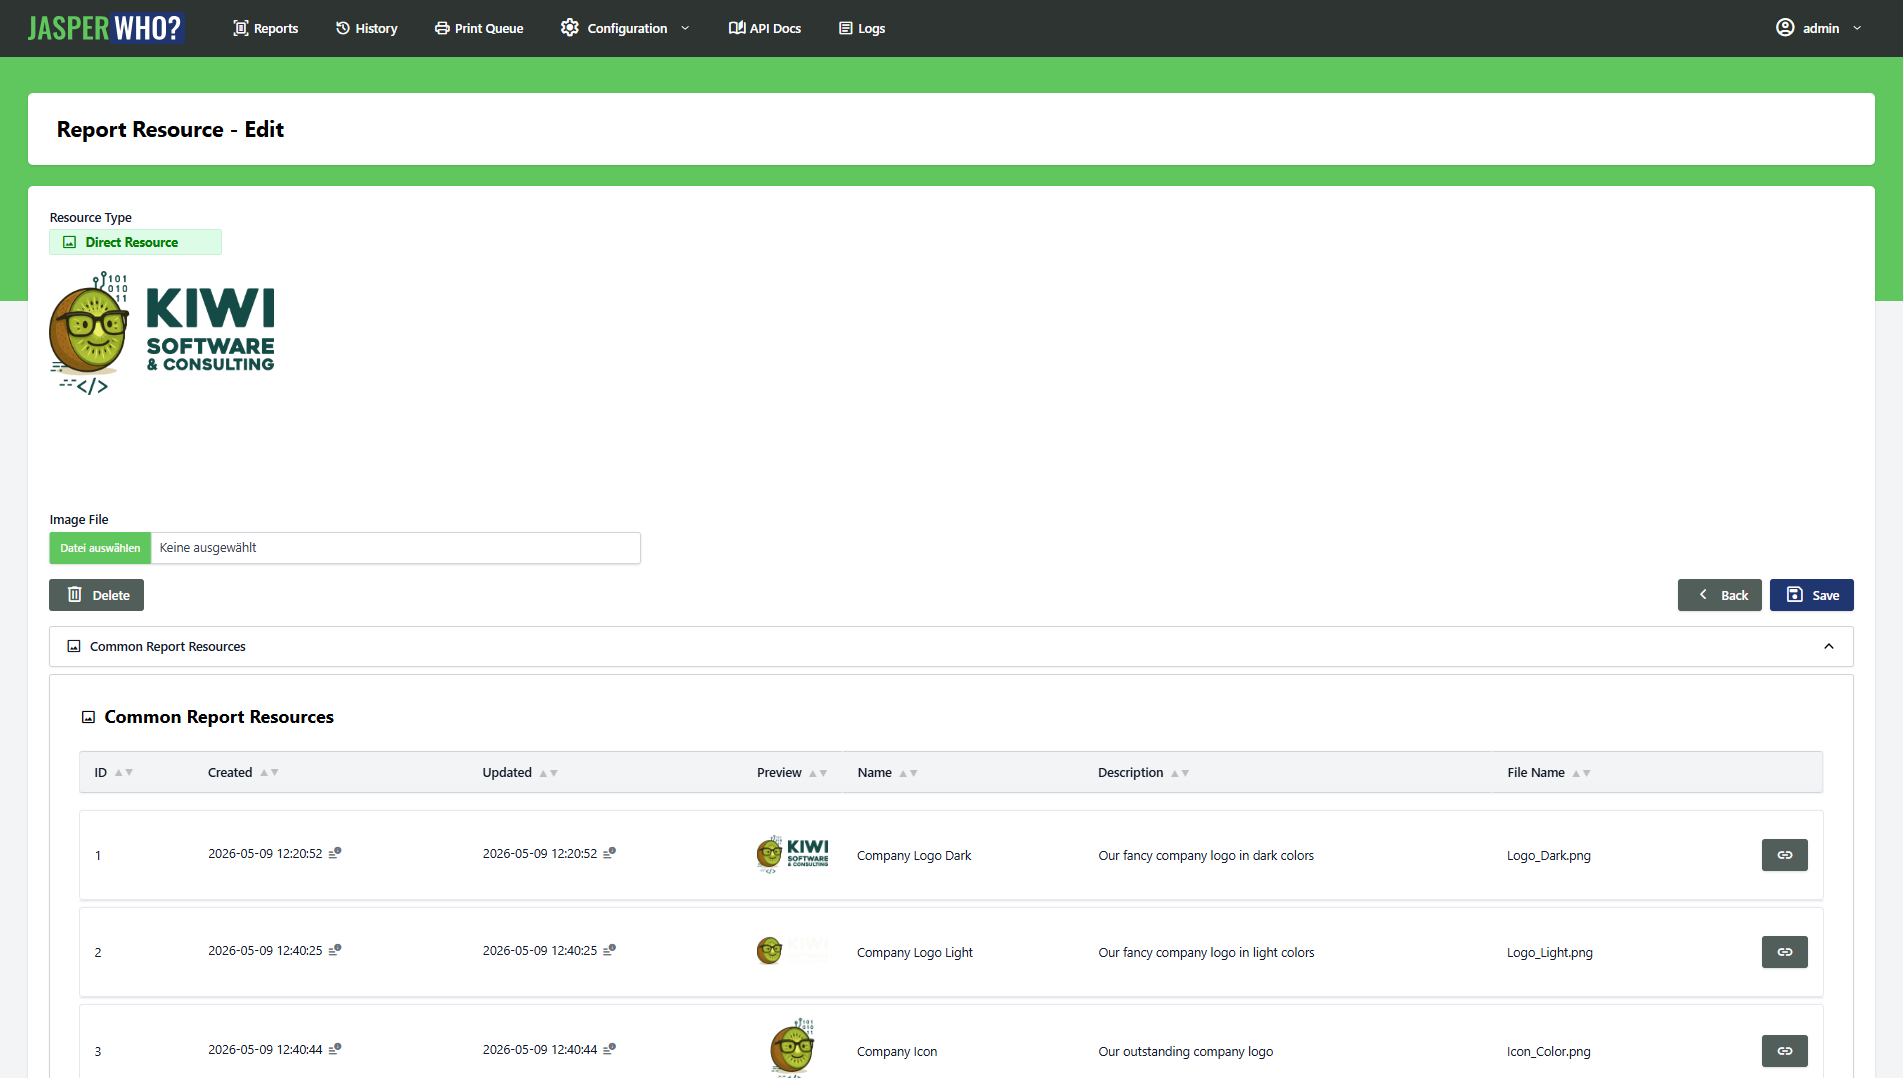
A ReportResource either holds its own uploaded file or it is linked to a CommonReportResource — never both at the same time. When linking to a common resource, the resource's own file is deleted and the common file is used in its place.
CommonReportResource
A CommonReportResource is a shared graphic asset — a company logo, a standard header image — that multiple report configurations can reference. Instead of uploading the same file to each report individually, you upload it once and link individual ReportResource records to it.
| Field | Description |
|---|---|
resource_name |
Display name |
resource_description |
Optional description |
resource_file_name |
Internal filename of the stored file |
ReportResource is linked to a CommonReportResource, its own file is permanently deleted. Unlinking removes the reference but does not restore the file — you will need to re-upload it.
ReportHistoryRecord
A ReportHistoryRecord captures the full context of a rendering — what was requested, what was returned, and whether it succeeded. Creating a history record is optional and controlled by the createHistoryRecord flag in the render request.
| Field | Description |
|---|---|
report_config_id |
FK → ReportConfig |
trace_id |
Unique identifier for this rendering run |
output_type |
How the PDF was returned (see below) |
report_api_payload |
The exact request payload sent to the render call |
report_api_response |
The full API response, stored for traceability |
report_pdf_base64 |
Base64-encoded PDF content |
report_pdf_file_name |
Filename on disk |
report_thumbnail_base64 |
Base64-encoded thumbnail of the first page (generated asynchronously) |
status |
Outcome of the rendering (see below) |
Output types (output_type):
| Value | Description |
|---|---|
base64 |
PDF returned inline as a Base64 string |
url |
PDF stored as a file, a URL is returned |
preview |
Rendered for preview; file is not persisted |
none |
No PDF output — used for print-only flows |
Status values (status):
| Value | Description |
|---|---|
| ok | Rendering succeeded, PDF received |
| render_fail | No errors reported, but no PDF received |
| error | JasperReports returned one or more errors |
| unknown | Status cannot be determined |
History records are retained for a configurable number of days — see Environment Configuration below. Thumbnails are generated asynchronously after rendering completes.
ReportPrintTask
A ReportPrintTask represents a print job dispatched to a physical printer. It is always linked to a ReportHistoryRecord — you always print a specific past rendering, not a report config directly.
| Field | Description |
|---|---|
report_config_id |
FK → ReportConfig |
report_history_record_id |
FK → ReportHistoryRecord |
trace_id |
Unique identifier for this print run |
broadcast_id |
WebSocket channel ID for real-time status updates (nullable) |
printer_name |
Target printer name |
copies |
Number of copies to print |
output_file_name |
Filename of the PDF sent to the printer |
output_base64_string |
Base64-encoded PDF (consumed by the print service) |
error_message |
Error detail if printing failed |
status |
Current print status (see below) |
Status values (status):
| Value | Description |
|---|---|
| pending | Created, waiting for the print service |
| printed | Successfully printed and confirmed |
| error | Printing failed |
| unknown | Status cannot be determined |
broadcastId is provided in the render request. The C# print service subscribes to that channel, picks up the task, executes the print job, and reports status back. Without a broadcastId, the task is created silently — the print service must poll for new tasks.
Audit Trail
Every model in JasperWho? tracks who created and last updated a record, and which API token was used. This information is available on all records via the withAudit=true query parameter in the API.
| Field | Description |
|---|---|
created_at |
Timestamp of creation |
created_by |
User ID of the creator |
created_by_token_id |
API token ID used (if created via API) |
updated_at |
Timestamp of last update |
updated_by |
User ID of the last updater |
updated_by_token_id |
API token ID used (if updated via API) |
The creationMethod and updateMethod fields in the API response ("Frontend" vs. "API") are derived automatically — based on whether a token was present on the request.
Environment Configuration
JasperWho?'s runtime behaviour is controlled via environment variables in .env or as container environment variables.
| Variable | Default | Description |
|---|---|---|
APP_SCHEME |
http |
URL scheme for generated links (http or https) |
API_RATE_LIMIT_PER_MINUTE |
10 |
Max API requests per minute per token |
PURGE_HISTORY_DAYS |
30 |
Age in days after which history records are purged |
PURGE_PRINTTASKS_DAYS |
30 |
Age in days after which print tasks are purged |
PURGE_ORPHANED_FILES_DAYS |
30 |
Age in days after which orphaned files on disk are purged |
PAGINATION_DEFAULT_COUNT |
25 |
Default number of results per API response |
Meet the frontend
JasperWho? comes with a built-in web frontend that gives you full access to every feature without writing a single line of code. It is built with Laravel Livewire — a reactive framework that delivers a dynamic, app-like feel while keeping everything server-rendered. No separate JavaScript build, no SPA complexity.
Navigation
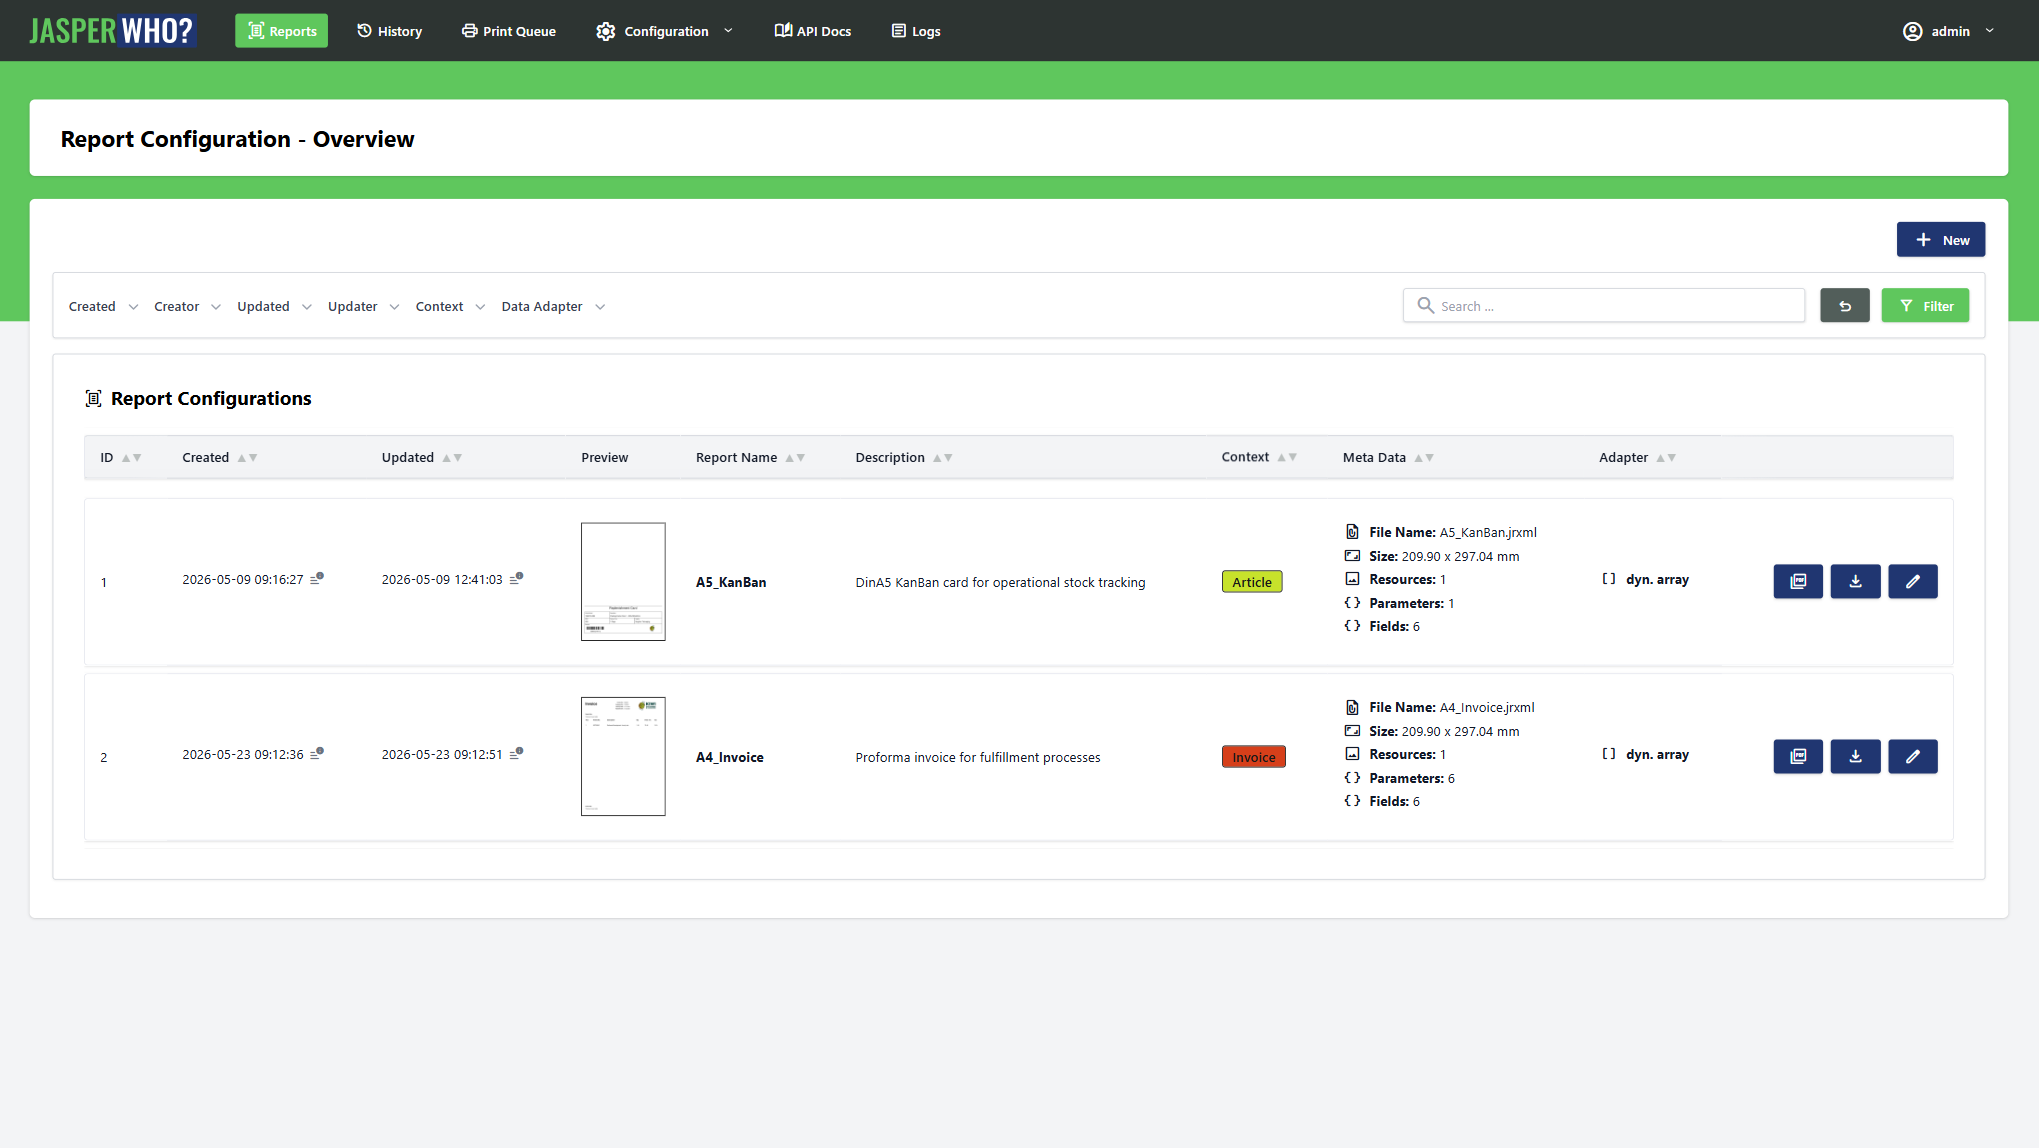
After logging in you land directly on the Report Configs overview — the central workspace. All other sections are reachable from the main navigation.
| Section | What you manage here |
|---|---|
| Report Configs | Your report templates — the heart of JasperWho? |
| Report History Records | Every past rendering with status, payload, and PDF |
| Report Print Tasks | Print jobs dispatched to the print service |
| Report Contexts | Organisational labels and visual tags for reports |
| Report Connection Configs | Live database connections for SQL-driven reports |
| Common Report Resources | Shared graphic assets reused across multiple reports |
| Users | User accounts and API token management |
The Lookup Pattern
Every section opens with a list view — powered by a Livewire Lookup component. These views work the same way across all sections, so once you know one, you know them all.
Full-Text Search
A search bar at the top filters records instantly as you type — no page reload, no submit button. Depending on the section, the search covers names, descriptions, file names, and query text.
Column Filters
Each list view offers contextual filter dropdowns tailored to the entity. For Report Configs, for example, you can filter by Context, Data Adapter, Creator, or date ranges for creation and last update. Active filters are indicated by a badge count on the respective dropdown so you always see at a glance which filters are in play.
Pagination
Results are paginated. The default page size is controlled by the PAGINATION_DEFAULT_COUNT environment variable (default: 25). See Configuration and Data Models for all available environment settings.
Working with Report Configs
The Report Config section has the richest set of actions and is where most of your day-to-day work happens.
Uploading a Template
Report templates are designed in Jaspersoft Studio (compatible version: 6.21.5) and exported as .jrxml files. Once you have a .jrxml ready, you upload it to JasperWho? to create a new Report Config. JasperWho? immediately analyses the file and automatically creates all associated Parameters, Fields, and Resources — based on what is defined in the template. You do not need to add these manually.
After upload you review the auto-generated records: set example values where missing, assign a Data Adapter if the report uses SQL, and upload any resource files that were detected.
Managing Parameters, Fields, and Resources
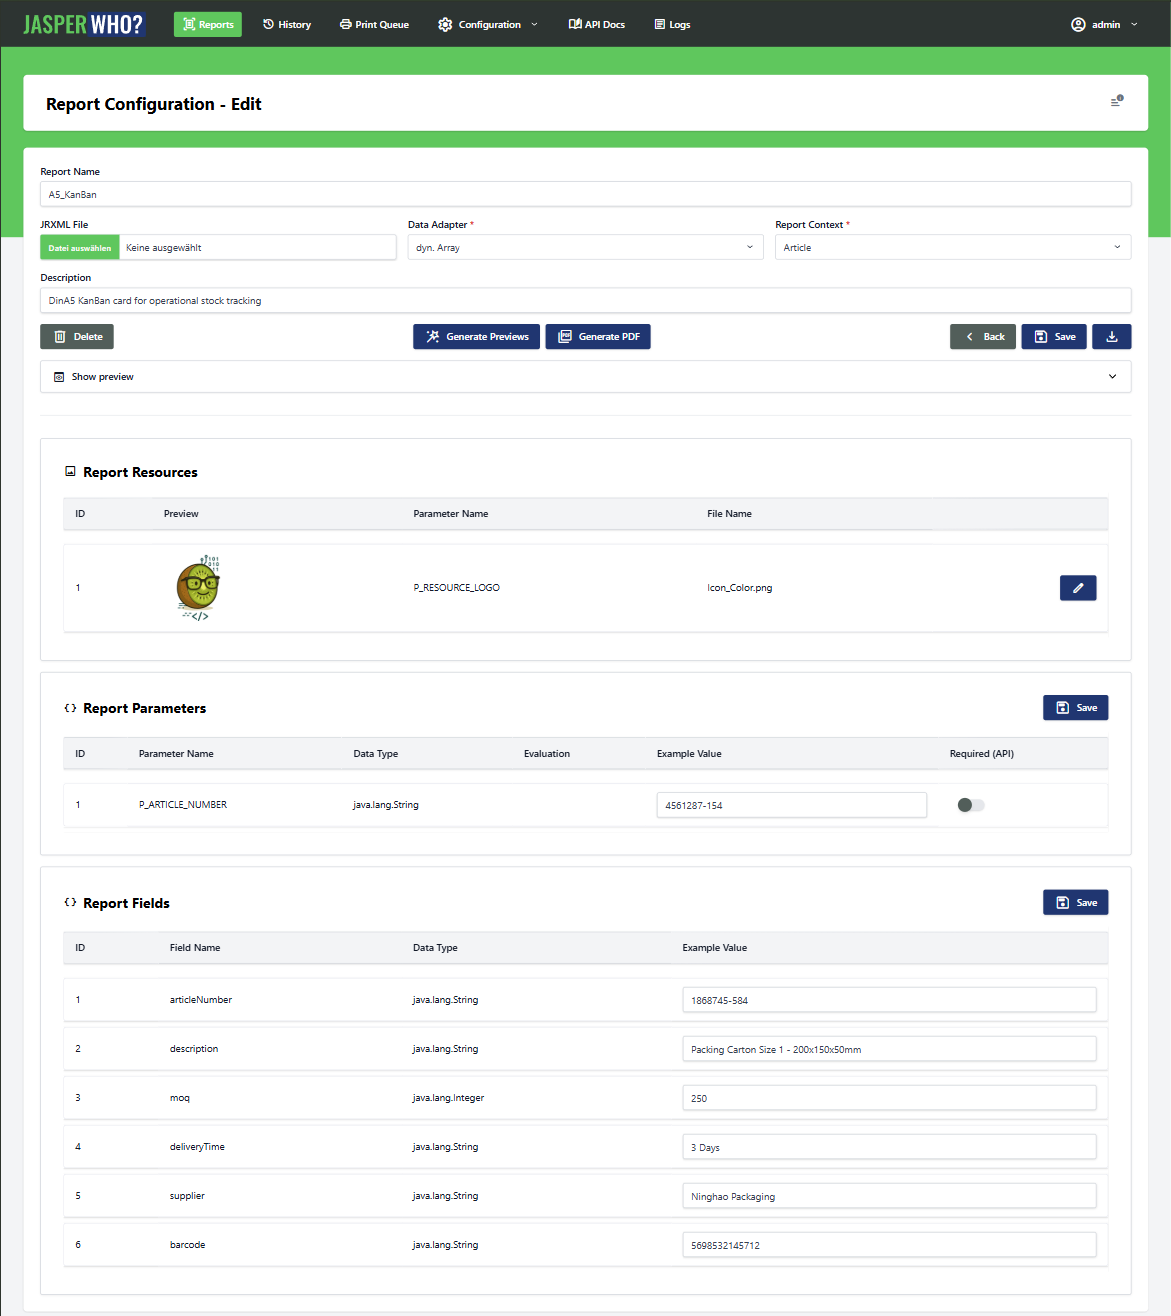
Parameters, Fields, and Resources each have their own section within the Report Config edit view. You can edit example values, mark parameters as required, upload resource files, or link a resource to a Common Report Resource — all from the same screen.
Generating Previews
Once all example values are set and all resource files are uploaded, you can generate a preview rendering directly from the edit view. JasperWho? renders the report using the stored example values and stores the result as a preview image and thumbnail on the Report Config.
Rendering from the Frontend
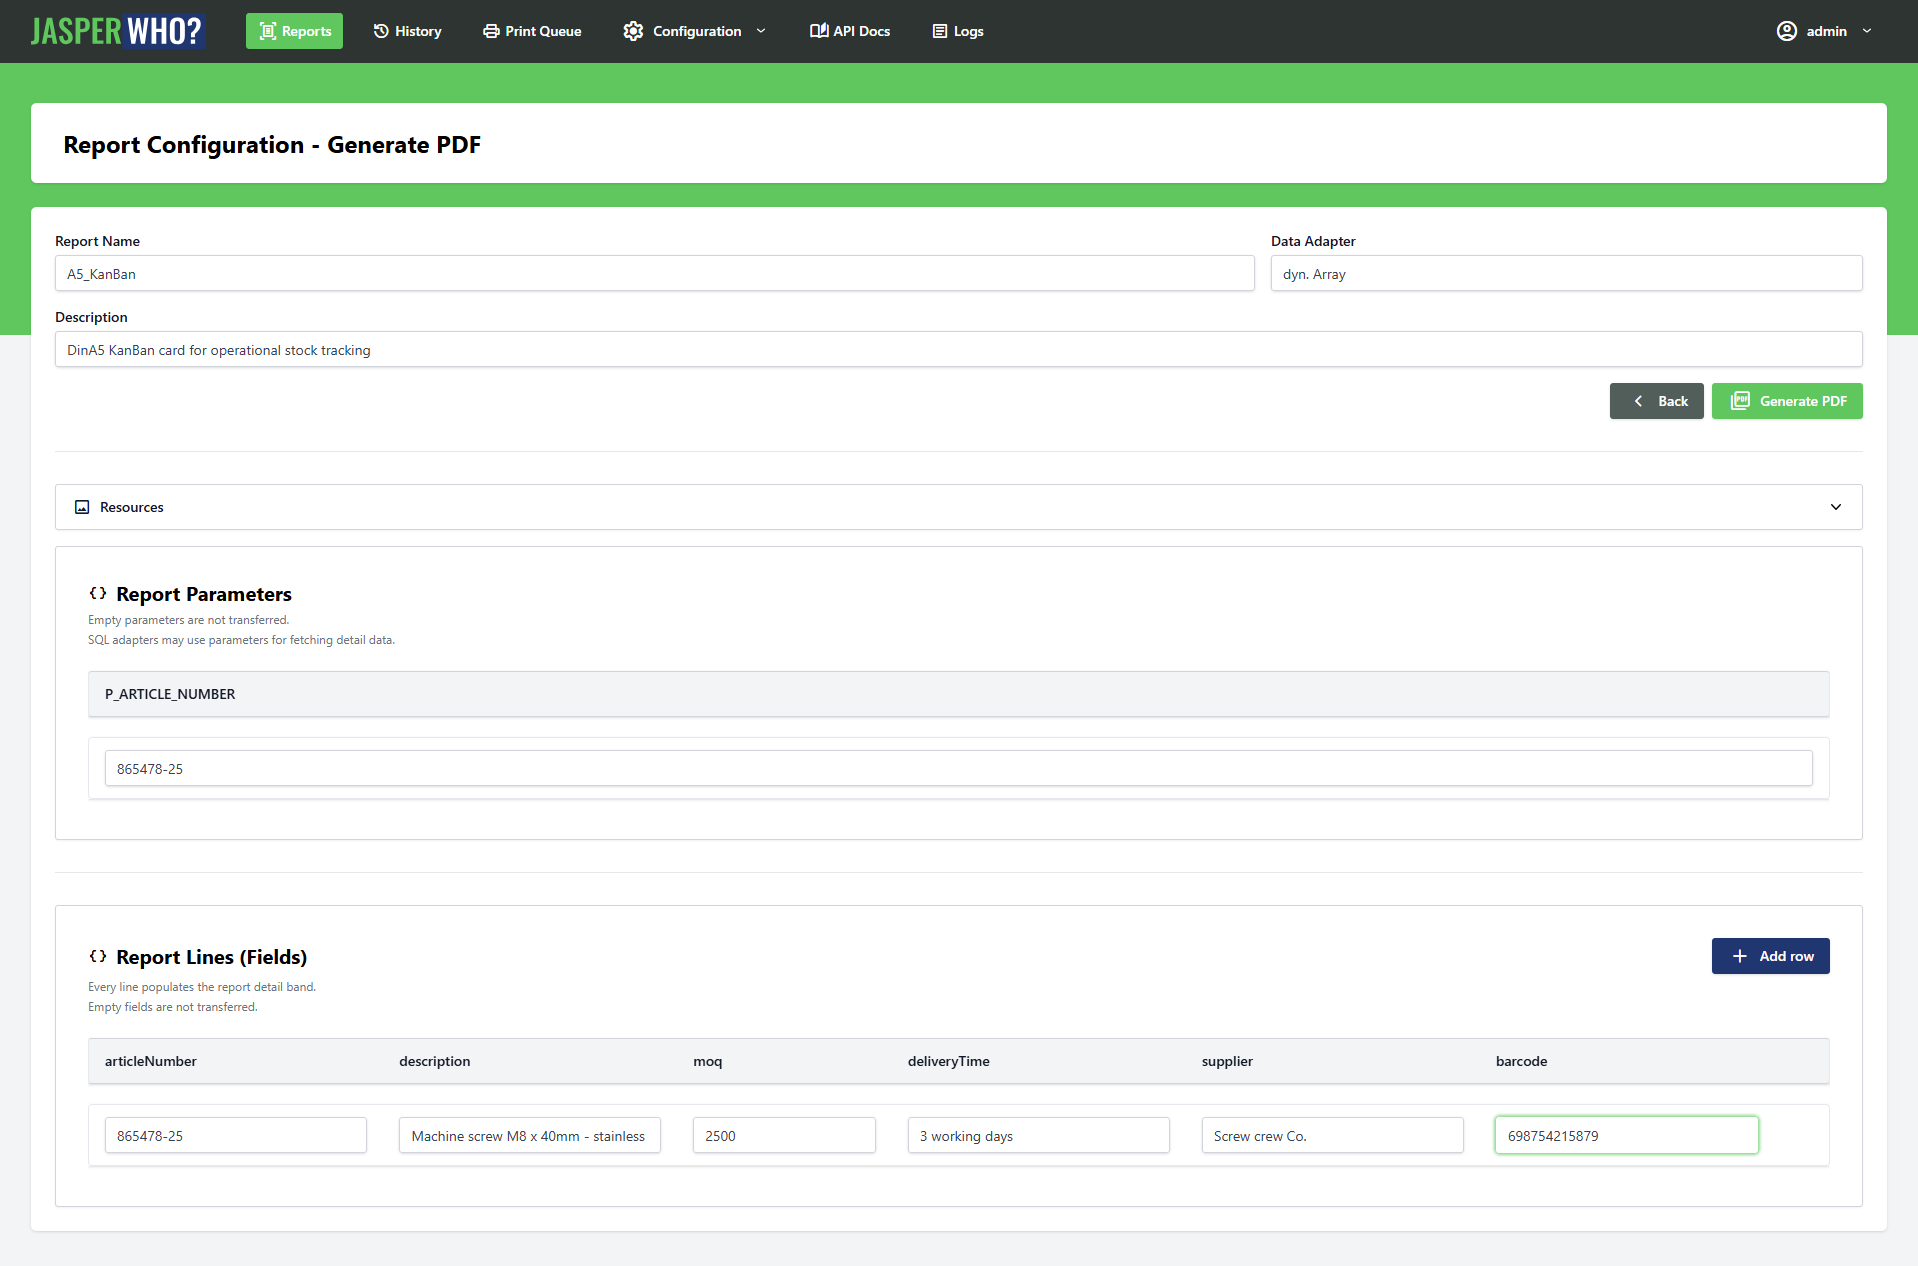
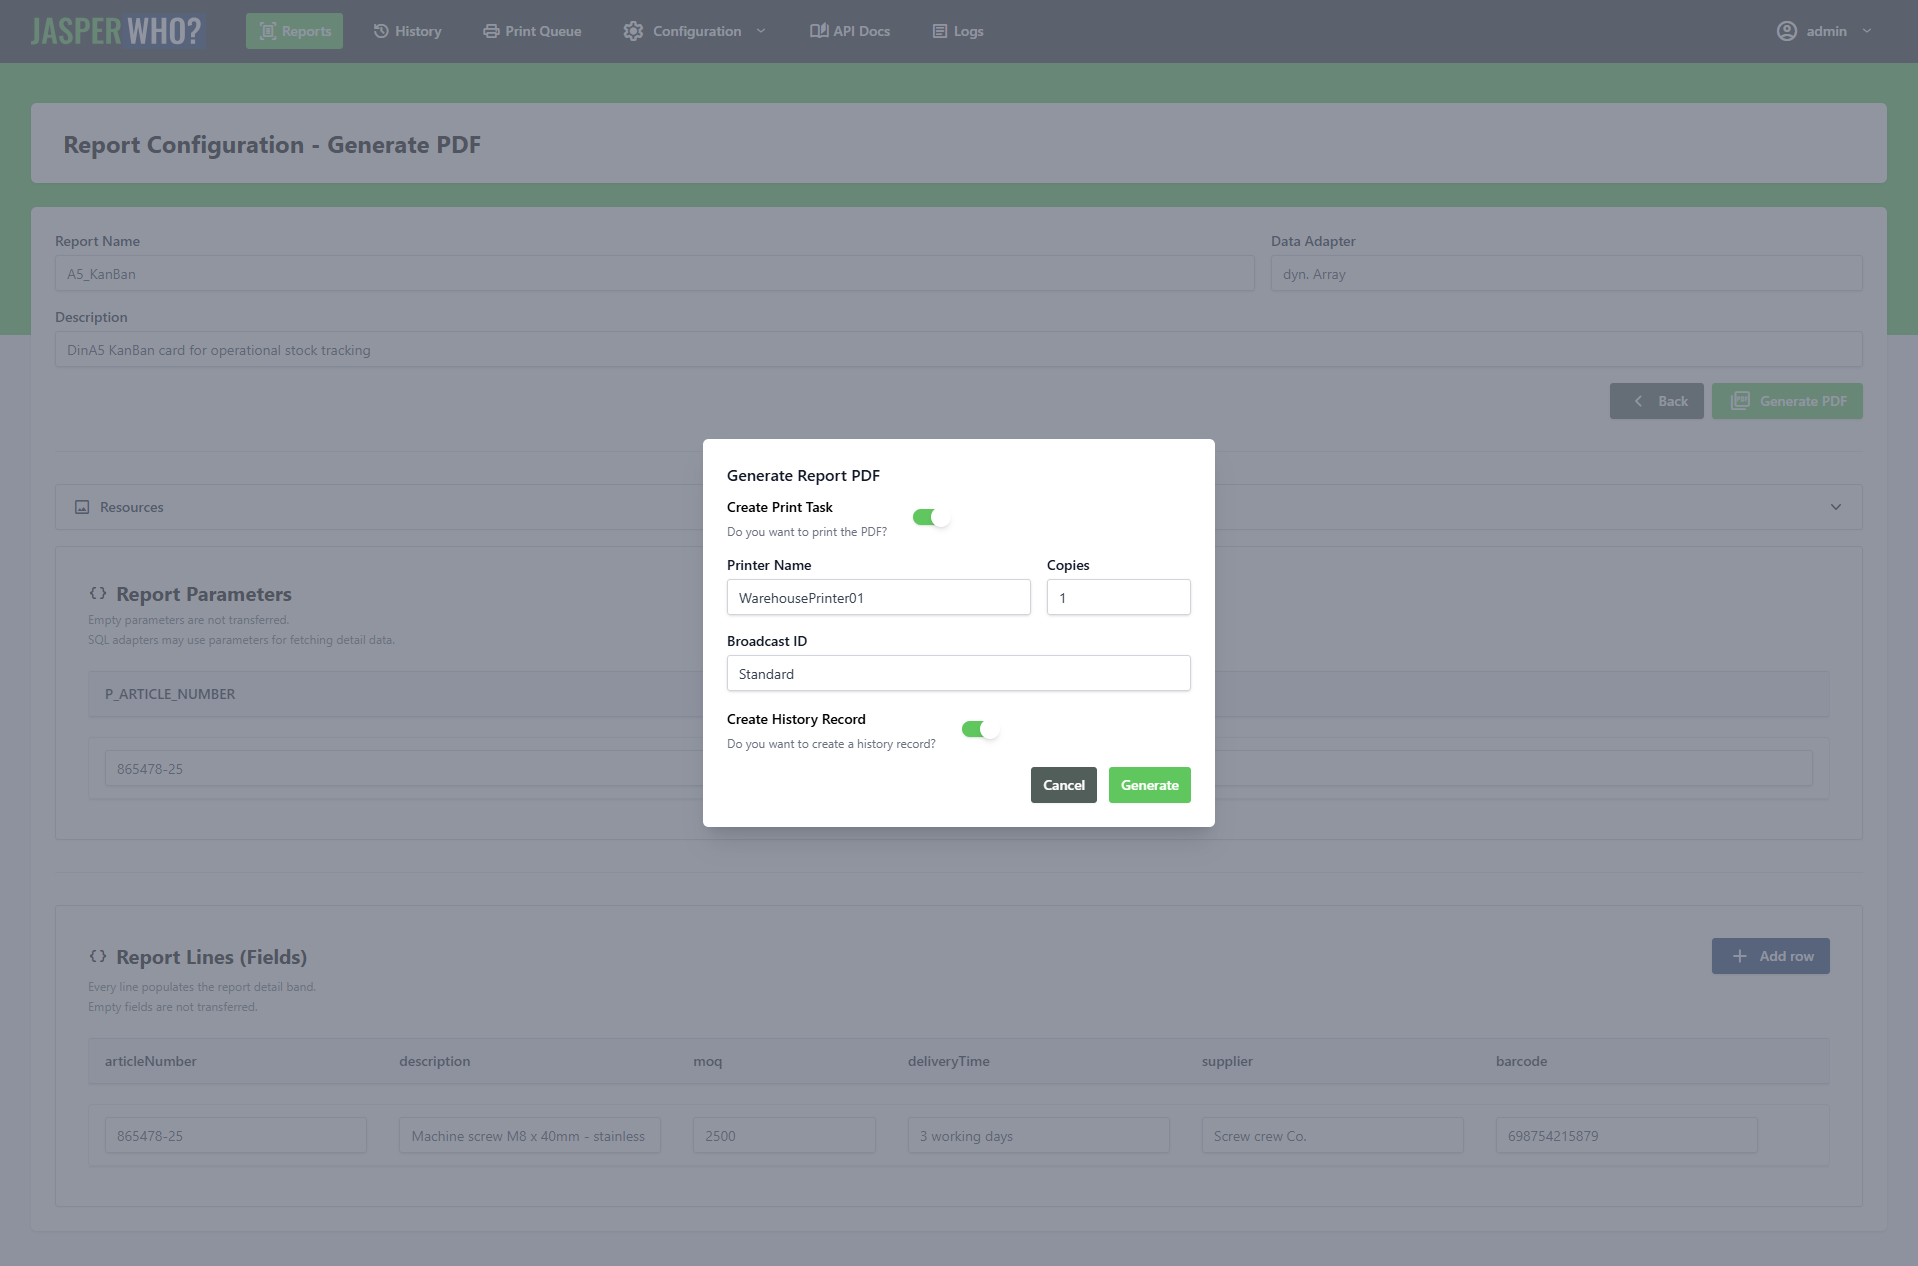
You can trigger a full render directly from the frontend — without touching the API. A render dialog lets you fill in parameter values, choose an output type, and optionally dispatch a print job in the same step. The result is shown inline and logged as a History Record if desired.
Report Connection Configs
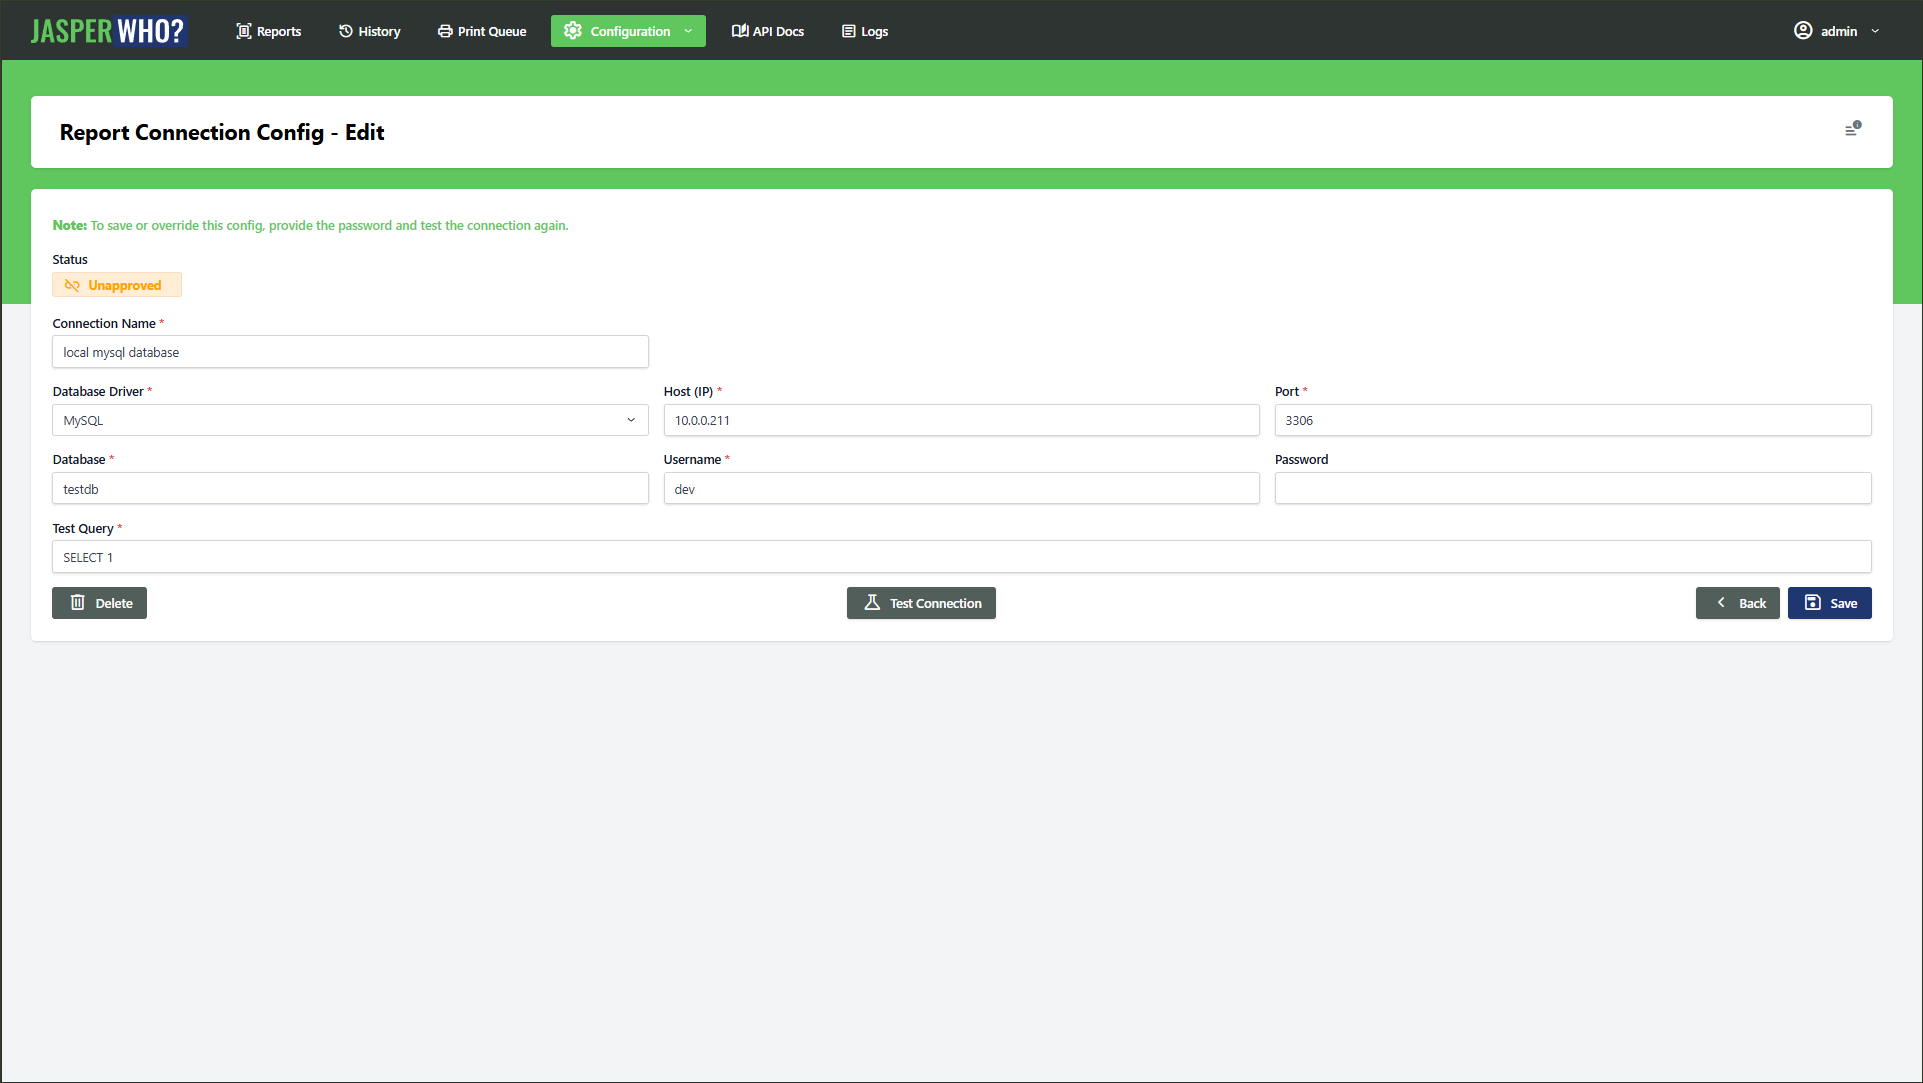
When creating or editing a Connection Config, the form includes a Test Connection button. Use it before saving — a connection must be in status approved before JasperWho? will use it for rendering. An untested or failed connection will cause render requests to be rejected.
Report History Records
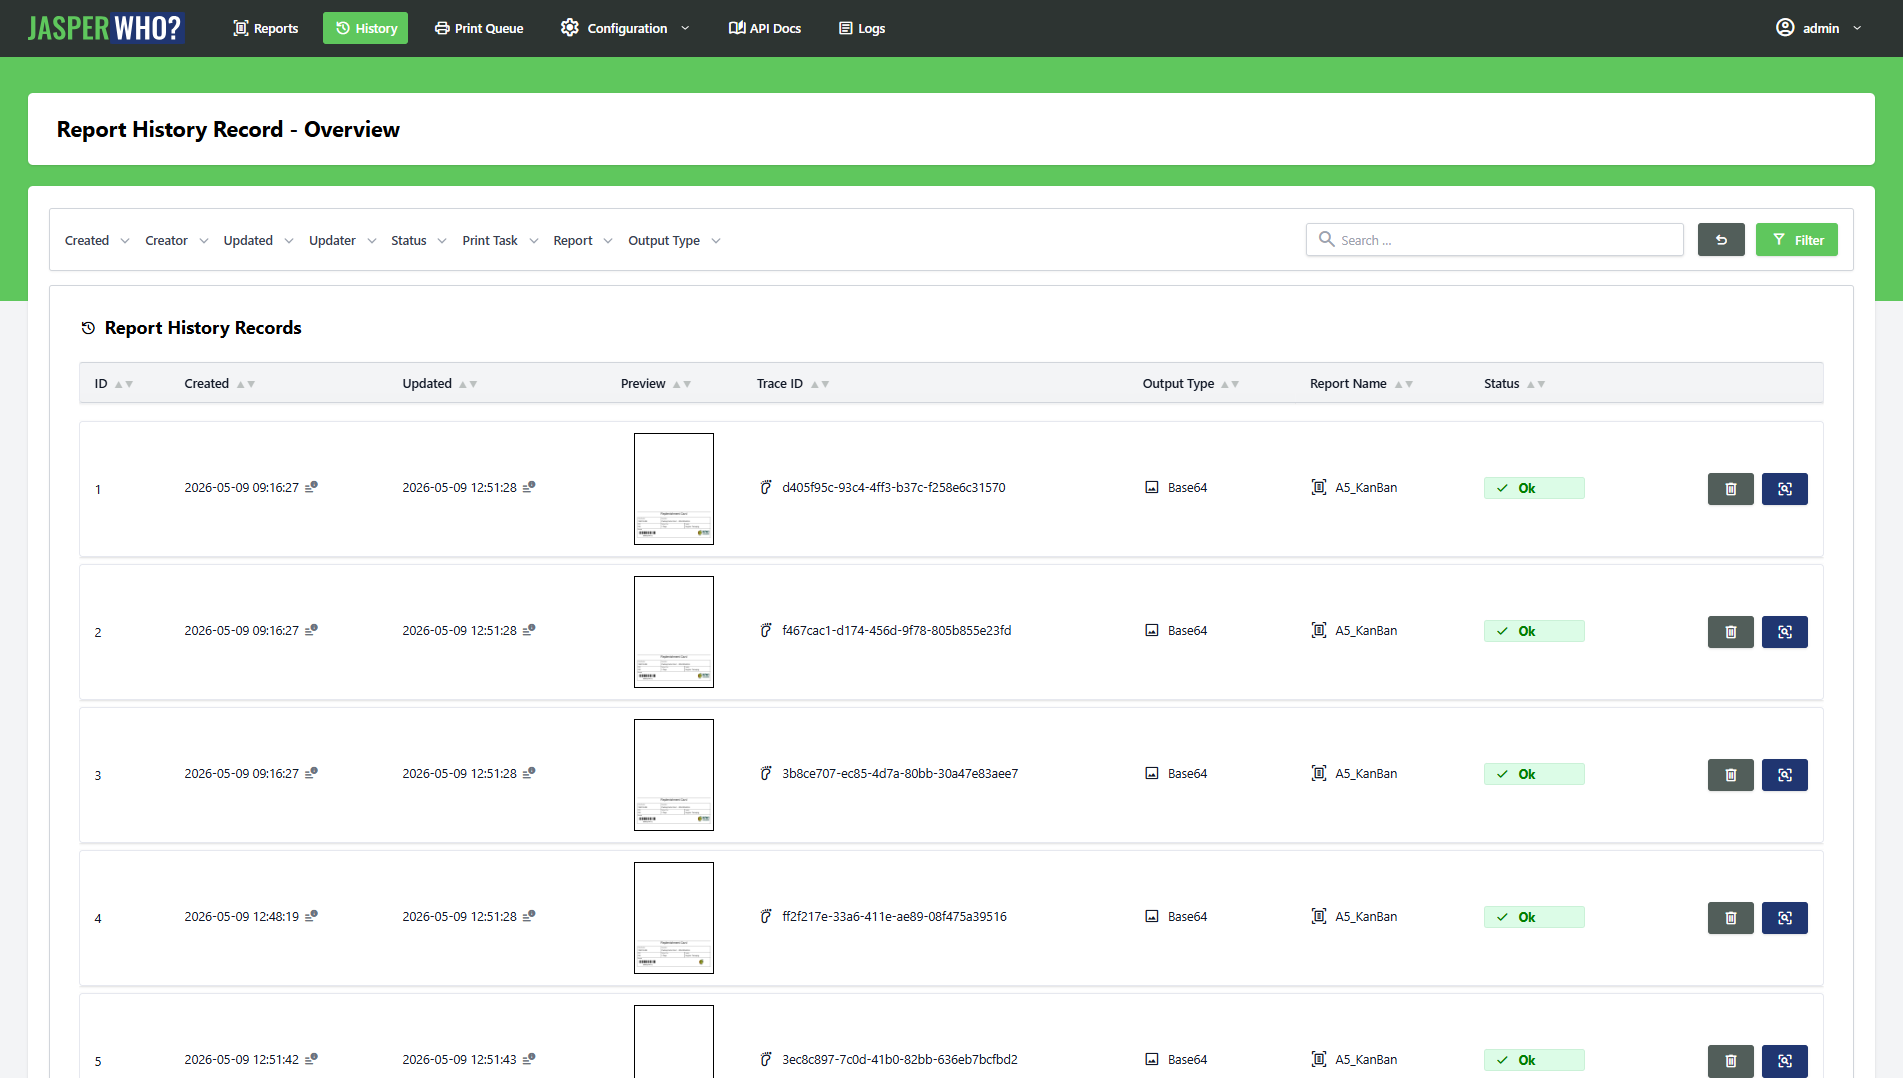
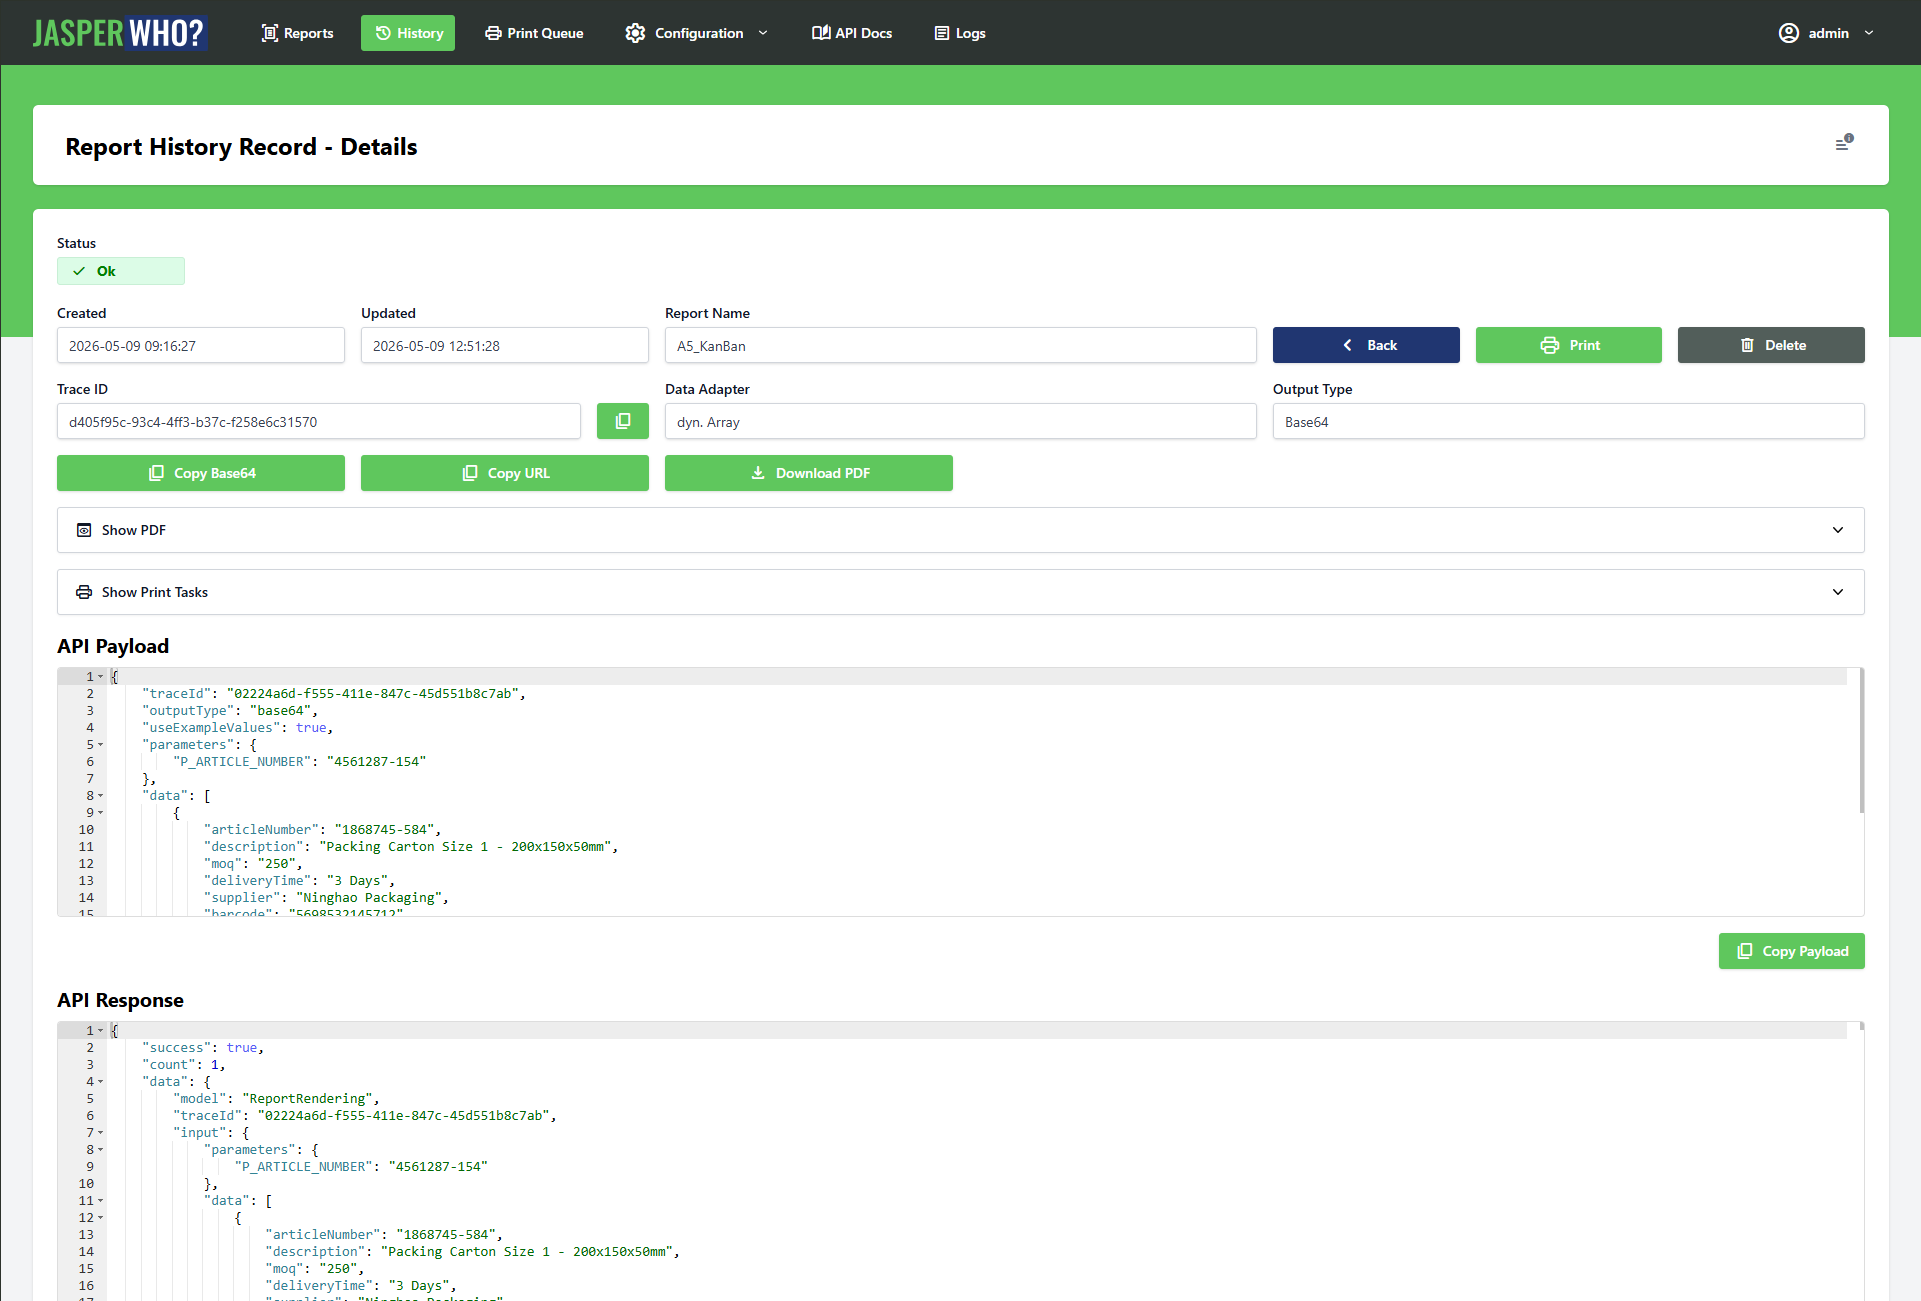
The History Records section gives you a full log of every rendering that was saved. For each record you can see the status, the exact parameters and data that were submitted, the raw JasperReports response, and — if the rendering succeeded — the resulting PDF.
From a History Record you can:
- Download the PDF directly to your browser
- Trigger a print job — creates a new Print Task for this specific rendering and dispatches it to the print service
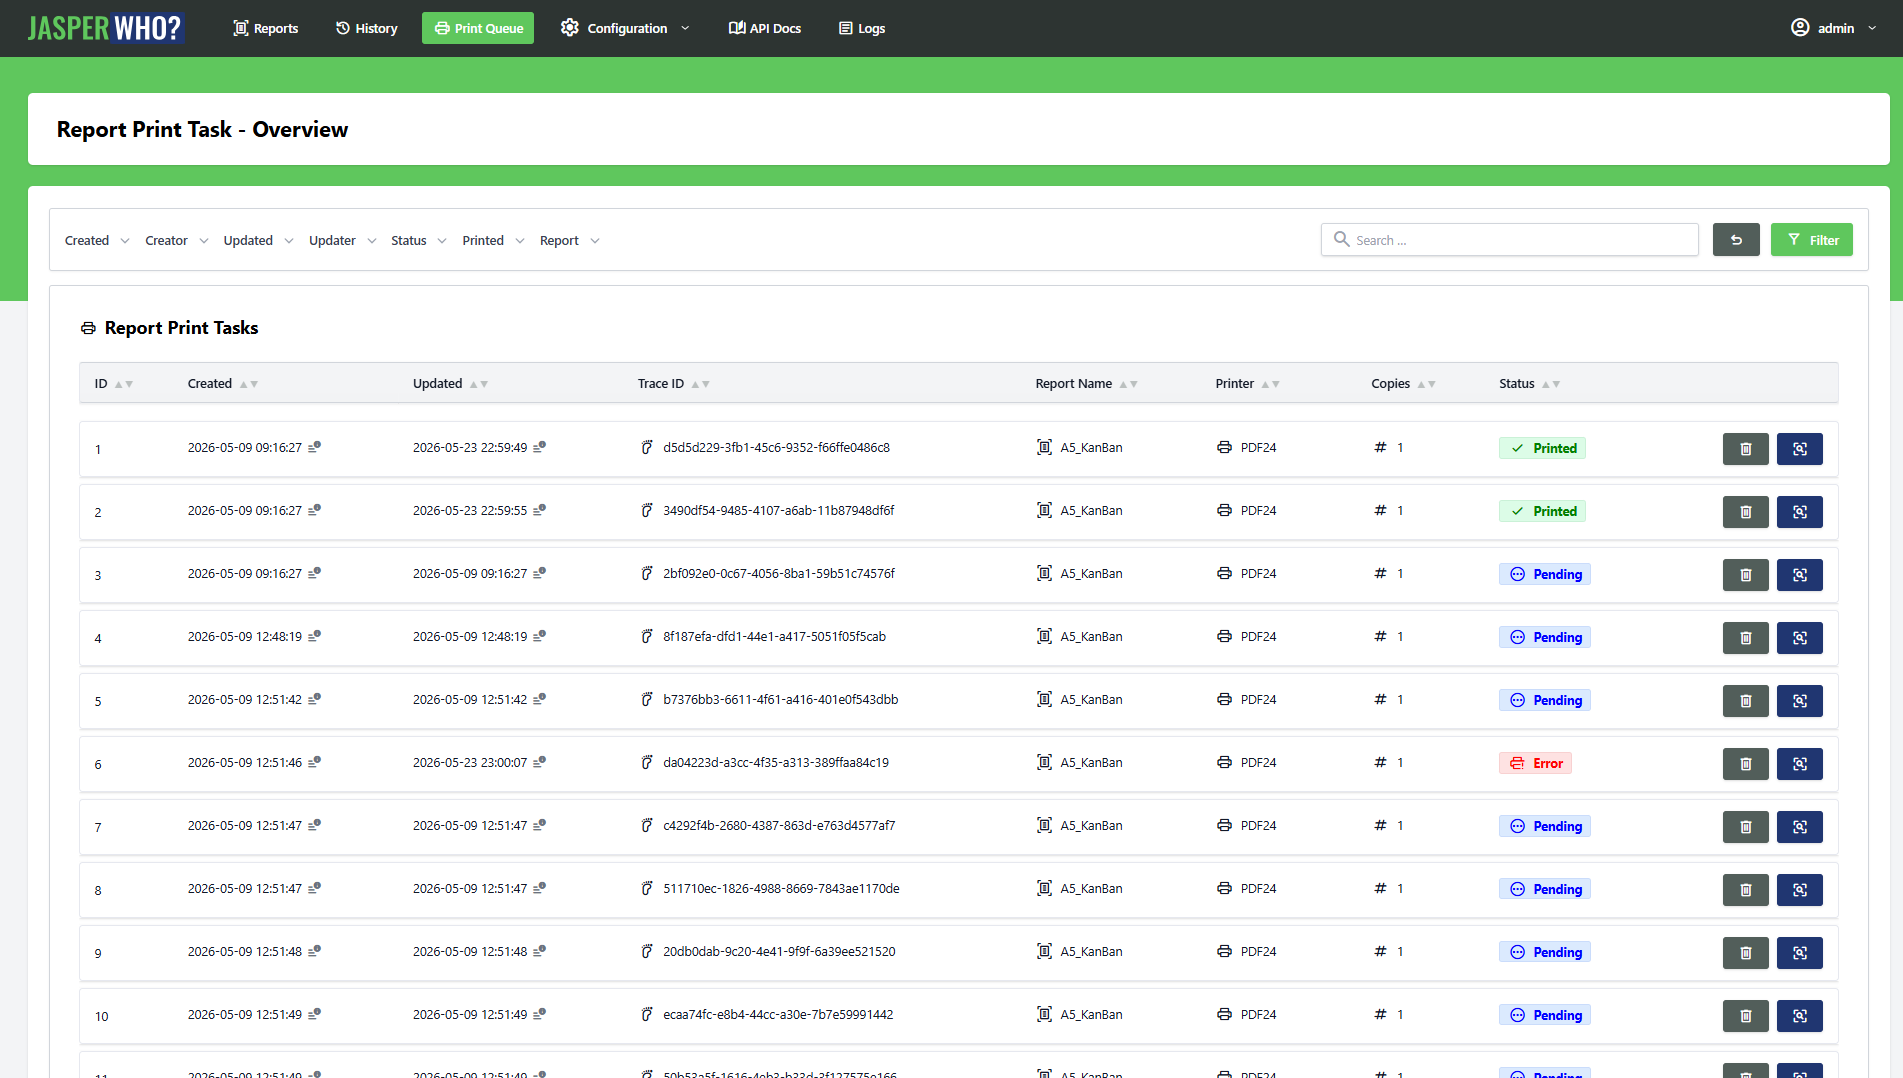
Report Print Tasks
The Print Tasks section shows all dispatched print jobs and their current status. For each task you can inspect the target printer, number of copies, and any error messages if printing failed.
If a task ended up in error state, you can reset it — the task returns to pending and the print service will pick it up again.
Users and API Tokens
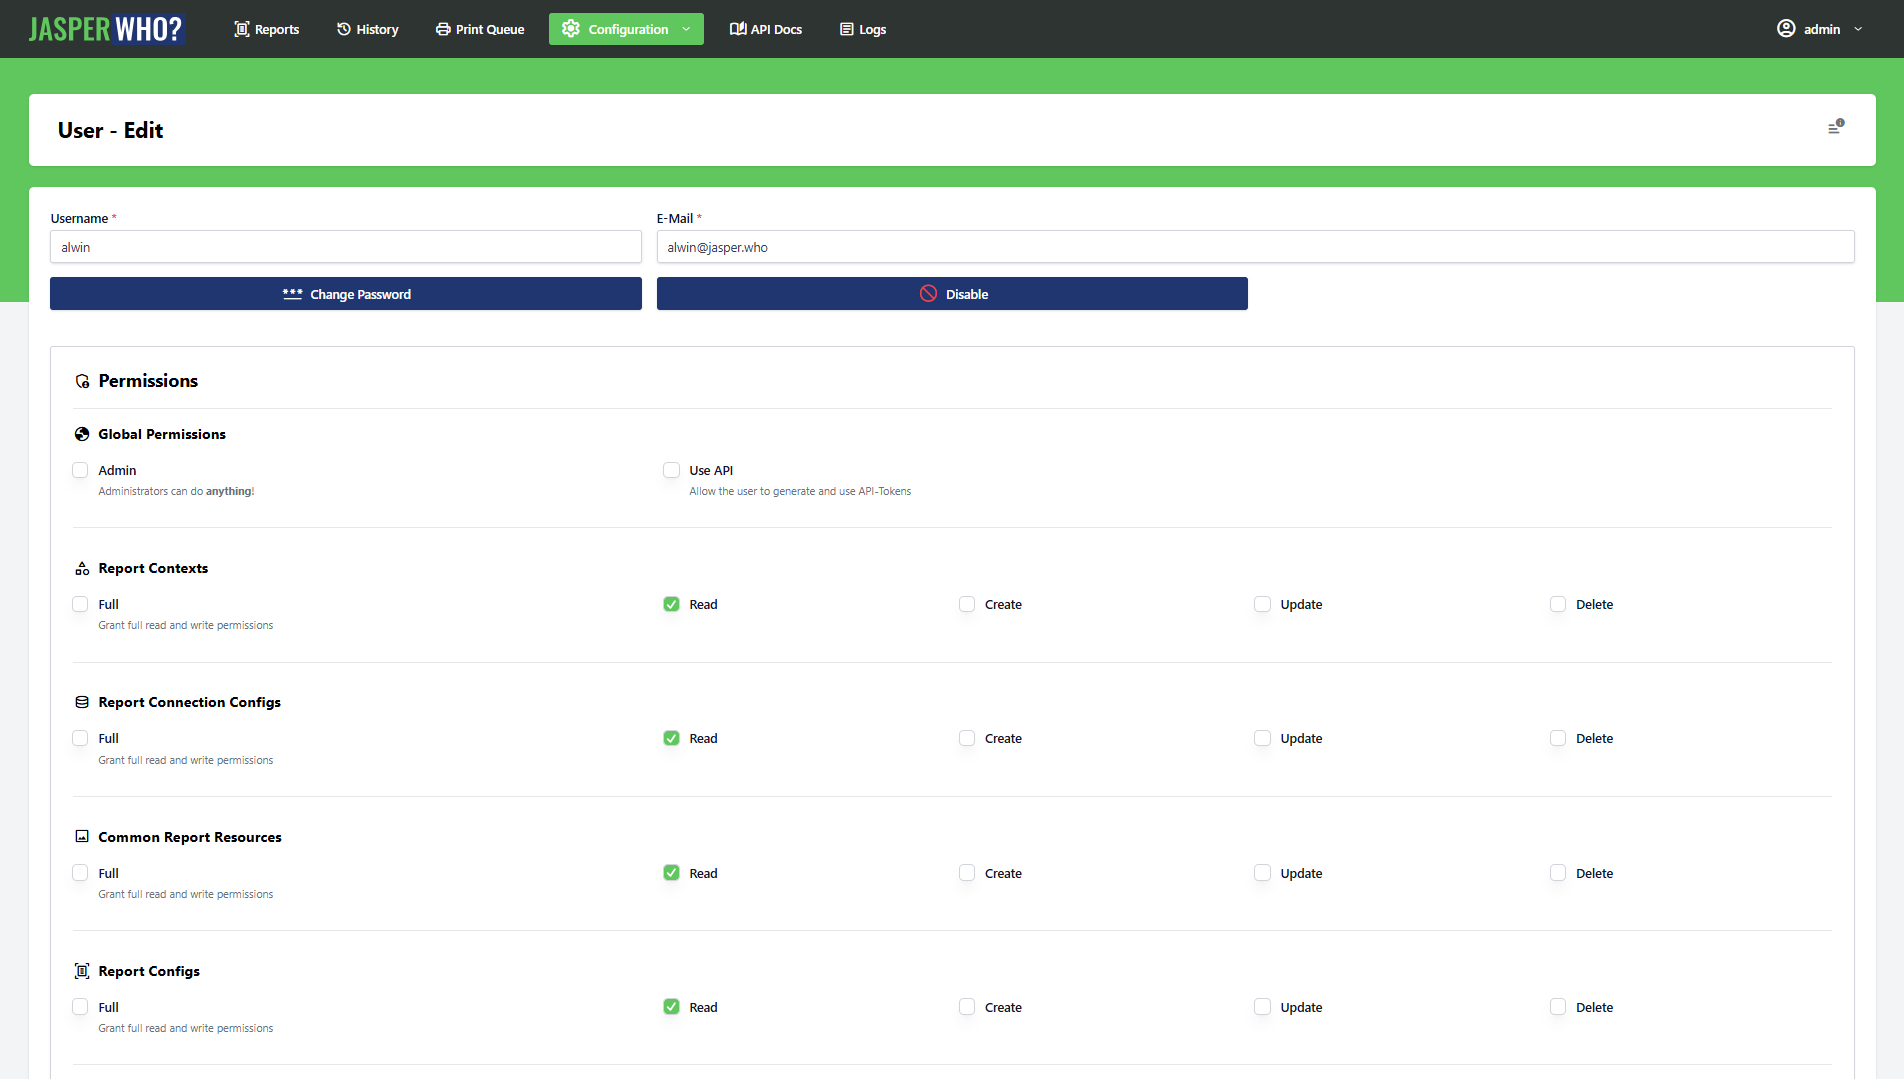
User accounts are managed under the Users section — accessible to administrators only. Each user can hold one or more named API tokens, which grant API access under that user's identity.
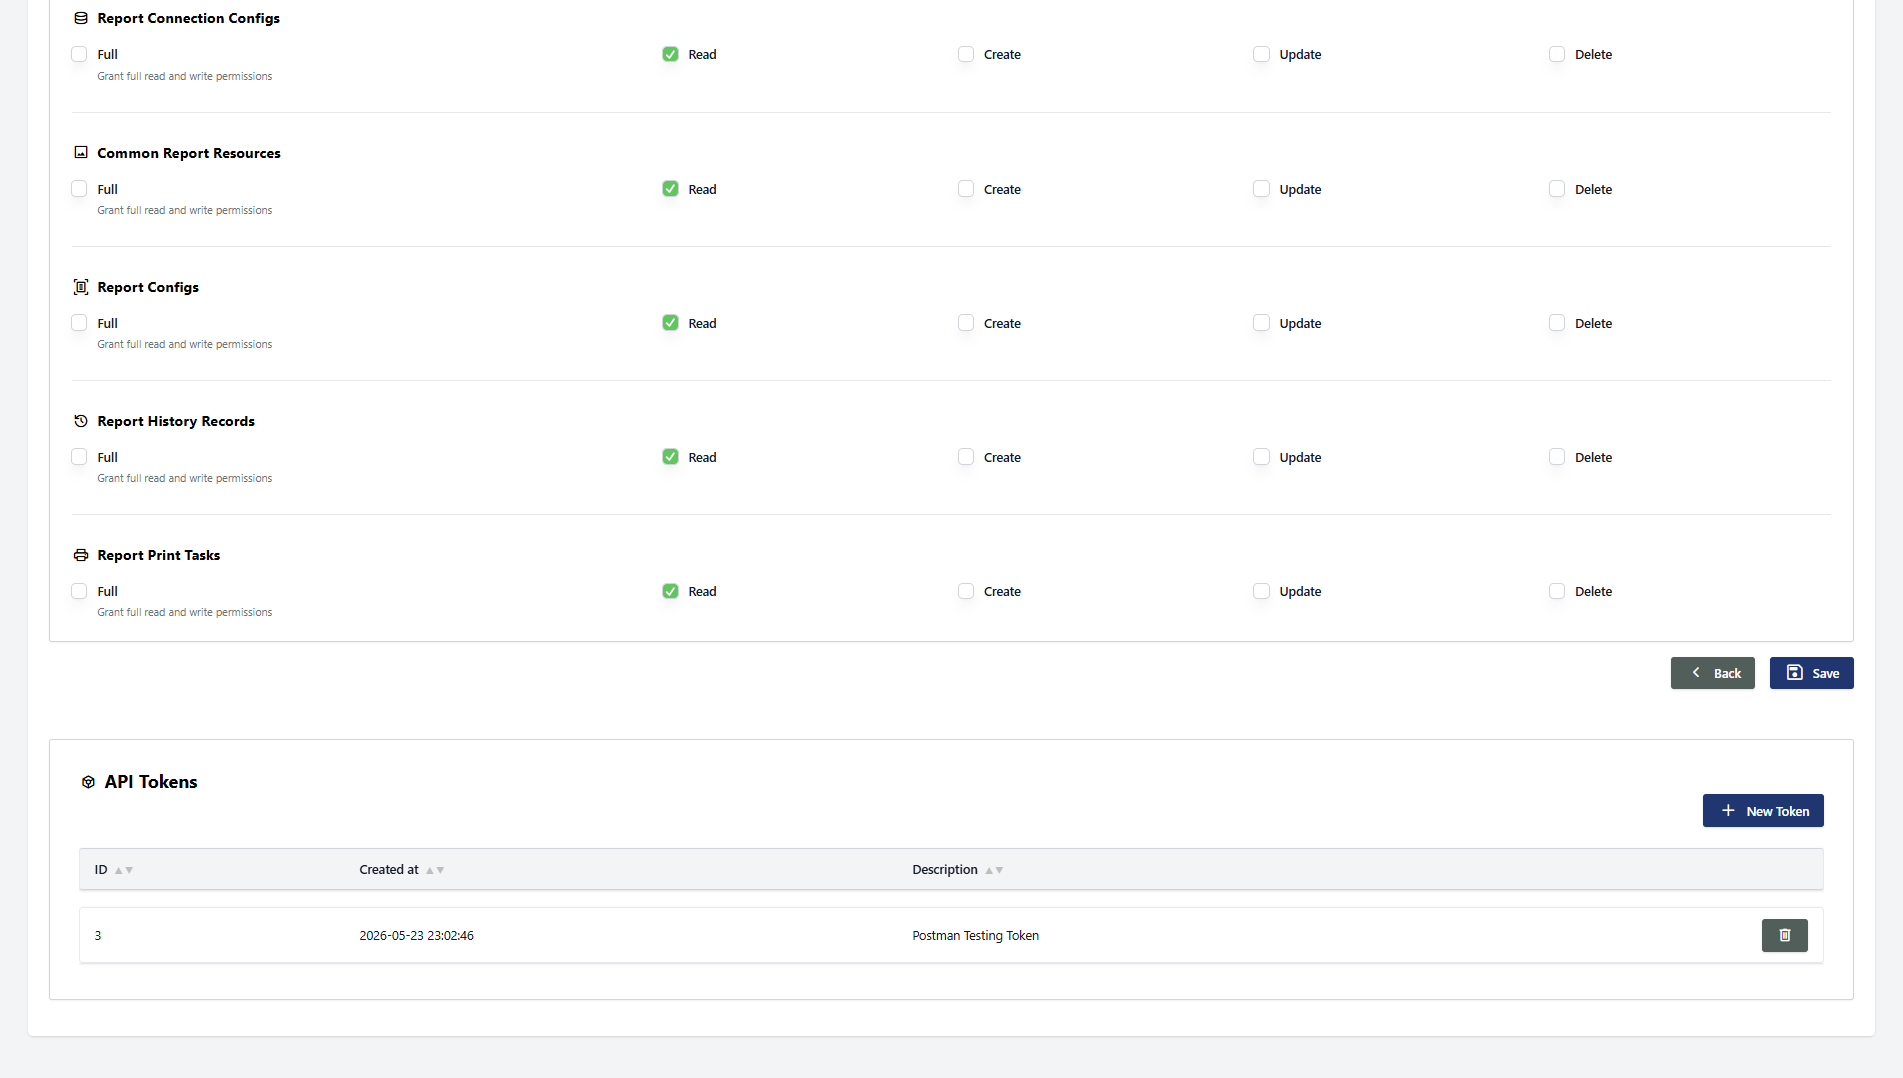
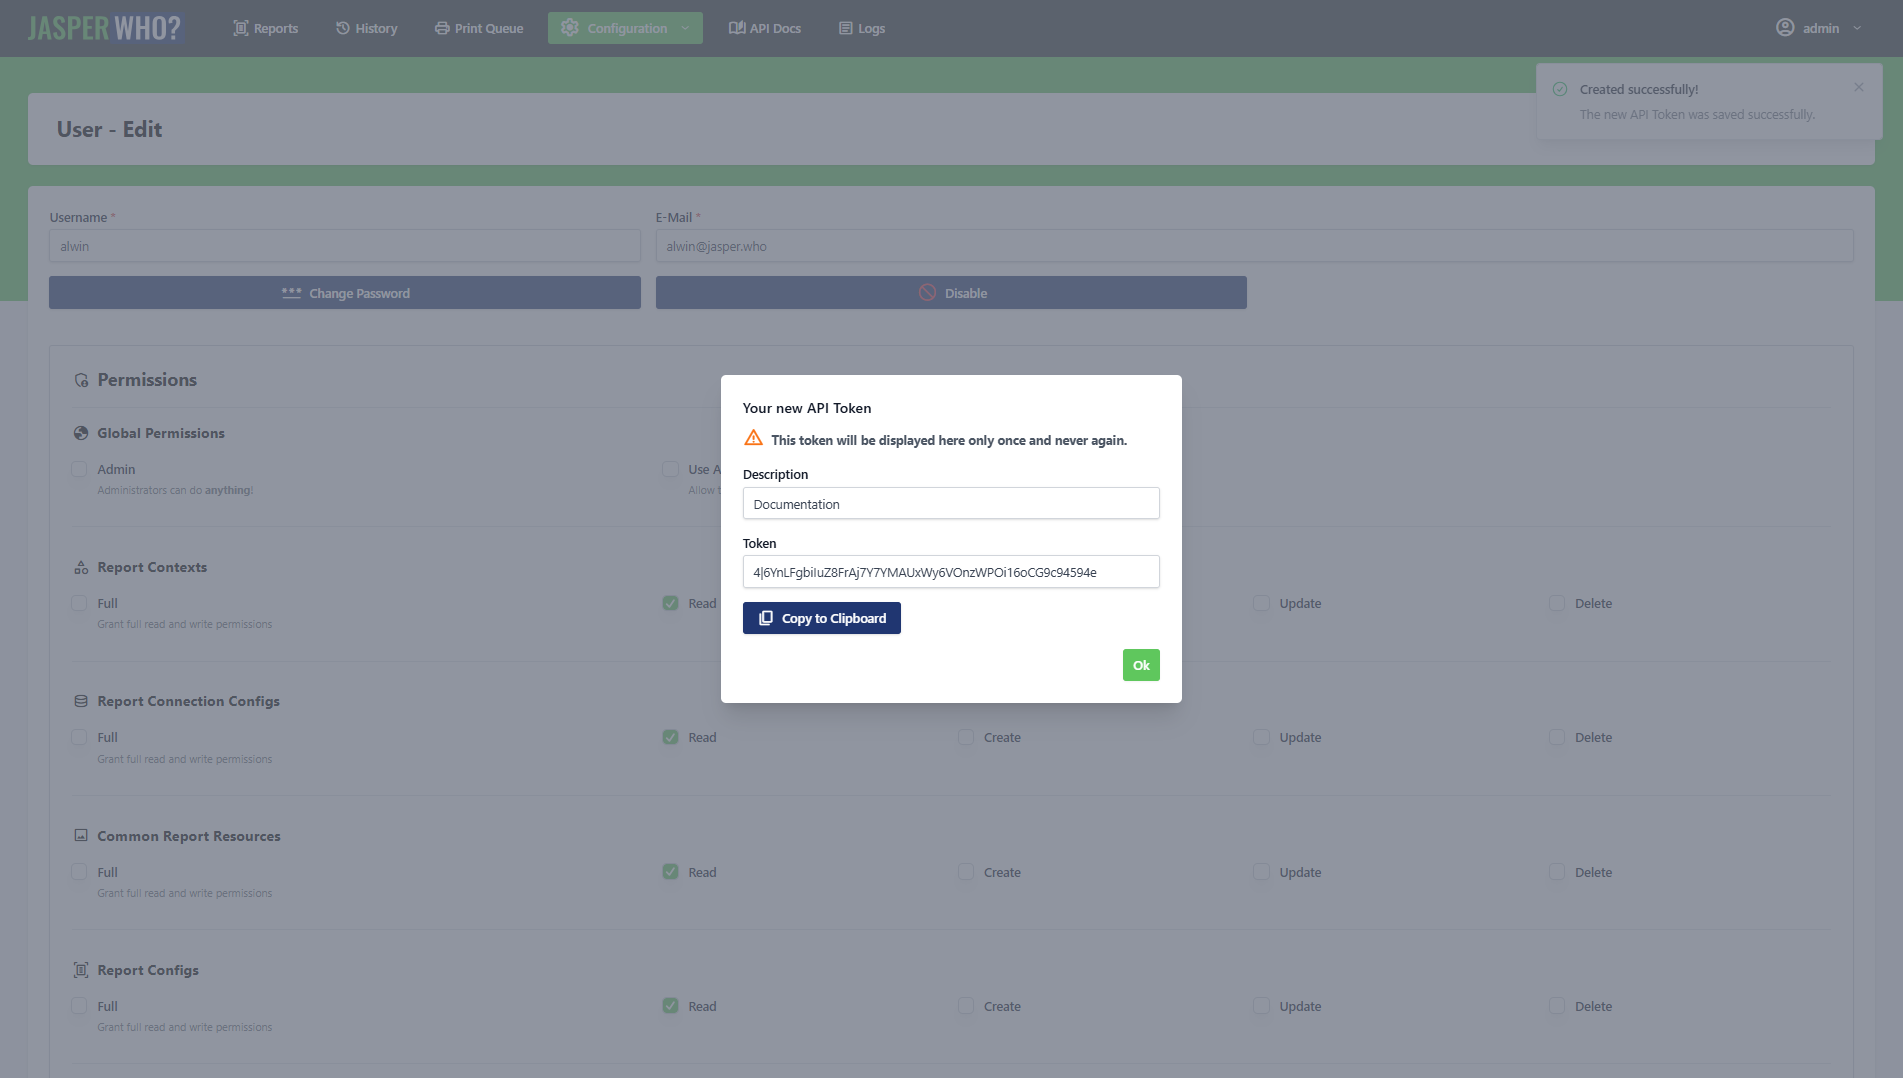
From the user edit view you can:
- Create a new token and copy it immediately after generation (it is only shown once)
- Revoke any existing token with immediate effect
Permissions
Every user in JasperWho? has a set of permissions that controls what they can see and do — both in the frontend and via the API. Since both use the same underlying controllers, a permission that restricts an action in the frontend restricts the exact same action via API, and vice versa. There is no way to grant API-only or frontend-only access to a resource.
Permissions fall into two categories: global and per-resource.
Global permissions:
| Permission | Effect |
|---|---|
global:admin |
Full access to everything, including user management |
global:use-api |
Allows use of the API and management of own API tokens |
Per-resource permissions — available for each of the following resources: report-config, report-connection-config, report-context, report-history-record, report-print-task, common-report-resource:
| Permission | Effect |
|---|---|
<resource>:full |
Full read/create/update/delete access to this resource |
<resource>:read |
View records only |
<resource>:create |
Create new records |
<resource>:update |
Edit existing records |
<resource>:delete |
Delete records |
global:admin always implies full access to all resources and overrides any per-resource setting.
Frontend vs. API — What is the Difference?
The short answer: there is no feature difference. The frontend calls the exact same controller methods as the API. Everything you can do in the UI, you can also automate via API.
The frontend is optimised for interactive, human-driven workflows — exploring reports, reviewing history records, testing connections. The API is the right choice when you want to integrate rendering into external systems, automate repetitive tasks, or process results programmatically.
Meet the API
JasperWho? ships with a fully capable REST API — and it is not an afterthought. Every action you can perform in the frontend can also be performed via the API, because the frontend and the API share the same controller methods. There is no separate implementation, no feature gap, no second-class citizen.
This makes the API a genuine alternative to the UI, not just an integration bolt-on. Automate report rendering in your CI pipeline, trigger prints from your ERP, manage report configurations programmatically — all with the same logic that powers the frontend you already know.
Login: demo@jasper.who · Password: demo
Authentication
The API uses token-based authentication via Laravel Sanctum. Every request must include a Bearer token in the Authorization header.
Authorization: Bearer your-api-token
Tokens are created and managed per user — either from the user management section in the frontend, or via the API itself (POST /api/v1/user/{id}/create-token). Each token can be revoked at any time. A revoked token is rejected immediately — there is no grace period.
{
  "success": false,
  "errors": ["This API token has been revoked."],
  "status": 401
}
The audit trail records which token was used for every create and update operation across all models, so every API action is fully traceable.
Base URL
All API v1 endpoints are prefixed with:
/api/v1/
Response Structure
All API responses follow a consistent envelope format.
Success:
{
  "success": true,
  "count": 1,
  "data": { ... },
  "meta": [],
  "status": 200
}
Error:
{
  "success": false,
  "errors": ["Descriptive error message"],
  "meta": {},
  "status": 404
}
The count field reflects the number of records in data — 1 for single-record responses, the actual number of returned records for collections. The meta field carries contextual information such as the traceId of a render run.
Query Parameters
Most GET endpoints and the render endpoint share a common set of query parameters that control what is included in the response. They are additive — combine them freely.
| Parameter | Type | Default | Description |
|---|---|---|---|
limit |
integer | 25 |
Maximum records to return. Set to 0 for all. |
withRelations |
boolean | false |
Include related models (e.g. parameters, fields, resources on a ReportConfig). |
recursiveRelations |
boolean | false |
Include nested relations within relations. |
withMedia |
boolean | false |
Include Base64-encoded file content, previews, and thumbnails. |
withAudit |
boolean | false |
Include the audit segment on each record (timestamps, users, token, method). |
Example — retrieve a single report config with all relations, media, and audit data:
GET /api/v1/report-config/1?withRelations=true&withMedia=true&withAudit=true
Audit Segment
When withAudit=true is set, every record in the response carries an audit block:
"audit": {
  "createdAt": "2026-05-08 11:26:30",
  "createdByUser": 2,
  "createdByToken": null,
  "creationMethod": "Frontend",
  "updatedAt": "2026-05-08 13:31:35",
  "updatedByUser": 1,
  "updatedByToken": "Postman",
  "updateMethod": "API"
}
creationMethod and updateMethod are derived automatically — "API" when a token was used, "Frontend" when the action came through the UI.
Render-Specific Request Body
The render endpoint (POST /api/v1/report-config/{id}/render) accepts the following fields in the request body (JSON).
| Field | Type | Required | Description |
|---|---|---|---|
outputType | string | ✅ | How to return the PDF: base64, url, preview, or none |
createHistoryRecord | boolean | ✅ | Whether to persist a ReportHistoryRecord for this render |
createPrintTask | boolean | ✅ | Whether to create a ReportPrintTask after rendering |
printerName | string | if createPrintTask | Name of the target printer |
useExampleValues | boolean | Use stored example values instead of supplying parameters manually | |
parameters | object | Key-value map of parameter names to values | |
data | array | Array of data rows — for reports without a live DB connection | |
numberOfCopies | integer | Number of print copies (default: 1) | |
broadcastId | string | WebSocket channel ID — triggers real-time status updates for the print task | |
traceId | string | Custom trace ID; auto-generated as UUID if omitted | |
laconicResponse | boolean | Strip the response to just the PDF output (see below) |
none requires createPrintTask: true. Rendering without any output and without a print task is rejected.
Laconic Responses
By default, a render response is fully populated — it includes the echoed input, the PDF output, the linked ReportConfig, the created ReportHistoryRecord, and the ReportPrintTask if applicable. In high-frequency or bandwidth-sensitive scenarios, add laconicResponse=true to strip everything down to just the PDF output.
Rate Limiting
The API enforces a configurable rate limit per token. The default is 10 requests per minute. When the limit is exceeded:
{
  "success": false,
  "message": "Too many requests! The current rate limiting is 10 requests per minute.",
  "status": 429
}
The limit is adjusted via the API_RATE_LIMIT_PER_MINUTE environment variable — see Configuration and Data Models.
Endpoints Overview
| Resource | Available operations |
|---|---|
| User | List, show, create, update, change password, enable/disable, create/revoke tokens |
| ReportContext | List, show, create, update, delete |
| ReportConnectionConfig | List, show, create, update, delete, test connection |
| CommonReportResource | List, show, create, update, delete |
| ReportConfig | List, show, create, update, delete, update resources / parameters / fields, generate previews, render |
| ReportResource | Link / unlink CommonReportResource |
| ReportHistoryRecord | List, show, create, update, delete, print |
| ReportPrintTask | List, show, create, update, delete, set printed, set status |
A Practical Example: The Full Render Response
A render call returns a ReportRendering object. By default it is fully populated — you see the input you sent, the PDF output, and the linked records that were created.
{
  "success": true,
  "count": 1,
  "data": {
    "model": "ReportRendering",
    "traceId": "a3f9c1d2-4e87-4b2a-9f1c-d3e8b7a20f61",
    "input": {
      "parameters": {
        "P_ARTICLE_NUMBER": "4561287-154"
      },
      "data": null
    },
    "output": {
      "reportPdfFileName": "a3f9c1d2-4e87-4b2a-9f1c-d3e8b7a20f61.pdf",
      "reportPdfBase64": "JVBERi0xLjQ...",
      "reportUrl": null
    },
    "reportConfig": { "..." },
    "reportHistoryRecord": { "..." },
    "reportPrintTask": null
  },
  "meta": {
    "traceId": "a3f9c1d2-4e87-4b2a-9f1c-d3e8b7a20f61"
  },
  "status": 200
}
Add laconicResponse=true and the response collapses to just output — no echoed input, no embedded related records. Ideal for automated pipelines that only need the PDF.
Try it out
The demo instance gives you a fully functional JasperWho? environment — pre-loaded with report templates and example data. Everything you can do in a production setup you can do here, with one exception: print tasks do not reach a real printer.
Access
The demo account has full access to all report data — Report Configs, History Records, Print Tasks, Connection Configs, Contexts, and Common Resources. It can also generate and use API tokens. User management is not available.
Guided Tour
Work through these steps in order for a complete first look at JasperWho?.
Step 1 — Browse the Report Configs
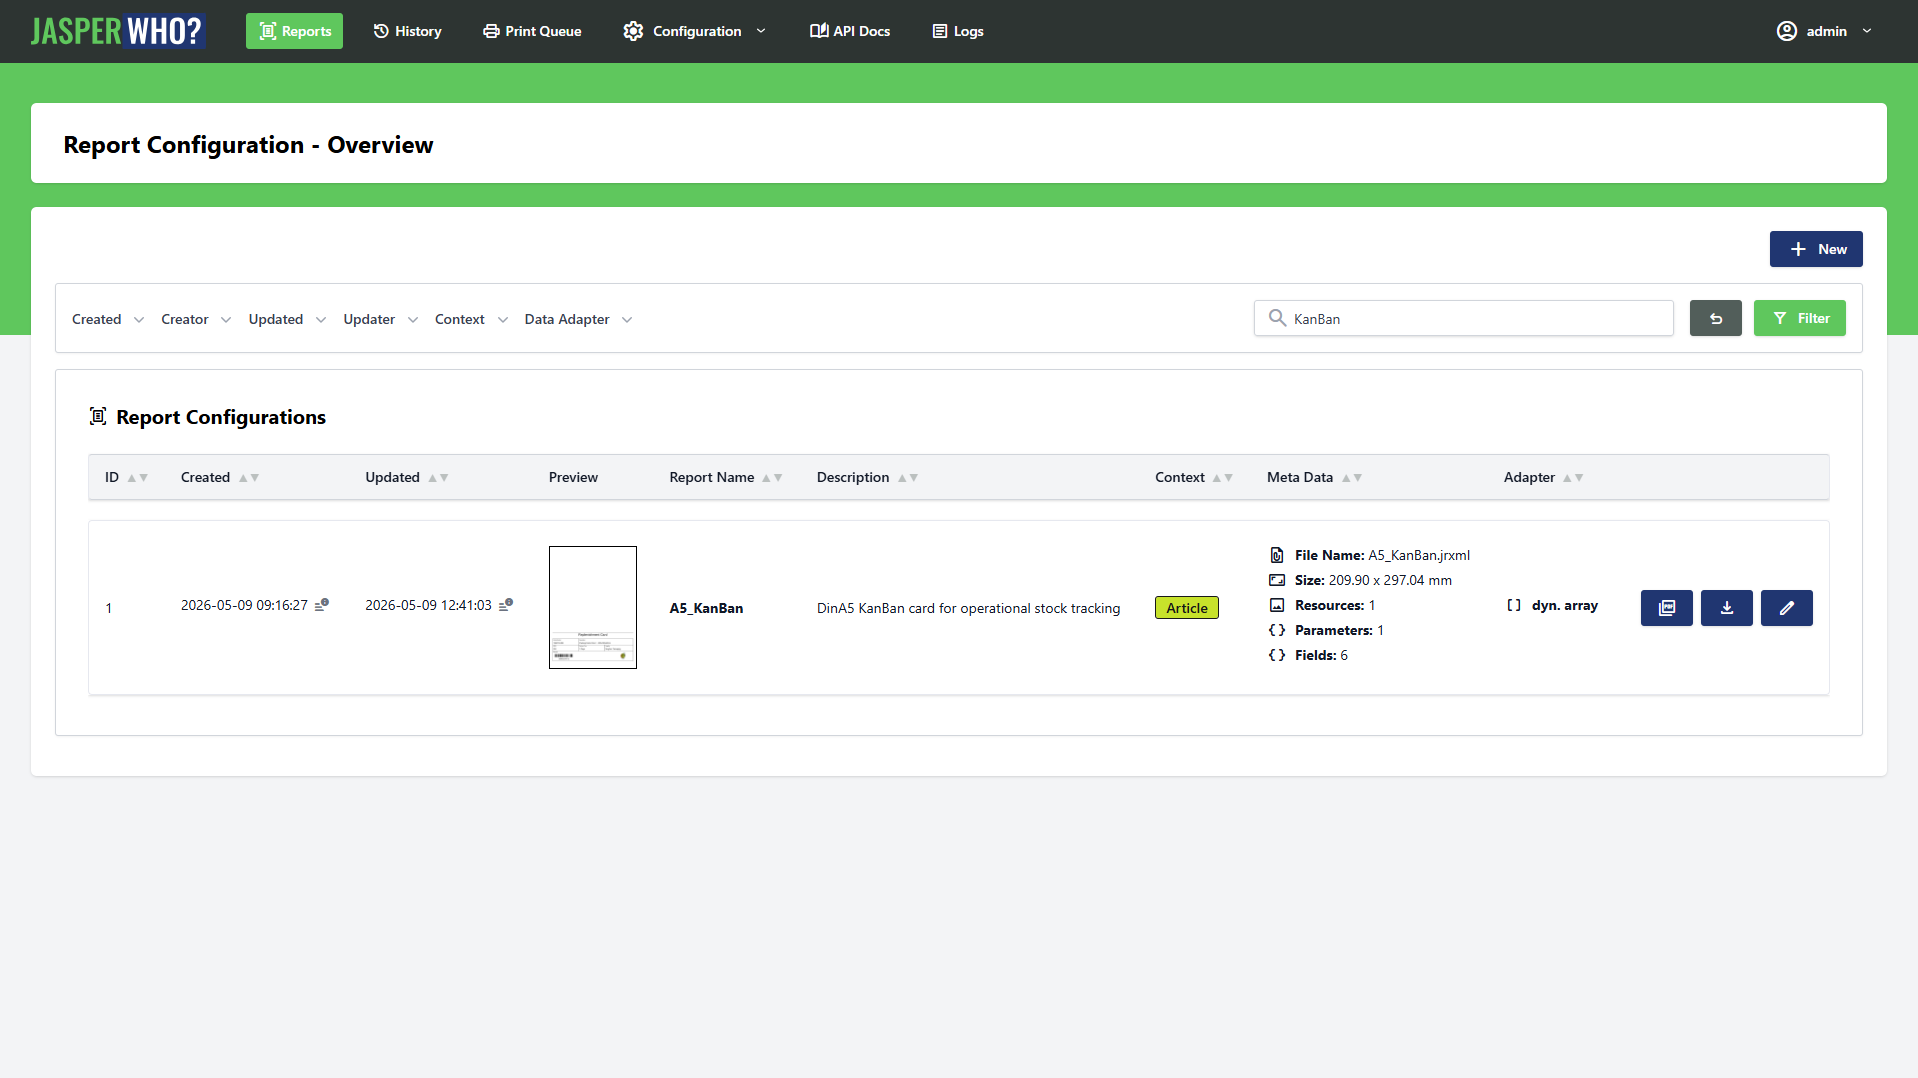
After logging in you land on the Report Configs list. This is the central workspace. Each card shows a thumbnail preview of the report and its context badge.
Use the search bar to filter by name, or use the dropdown filters to narrow by context or data adapter. Try typing part of a report name — the list updates instantly, no page reload.
Step 2 — Explore a Report Config
Click any report to open its detail view. Here you can inspect:
- Parameters — the inputs the report expects at render time, with their data types and example values
- Fields — the data columns that populate the report body
- Resources — image assets embedded in the template (logos, icons)
- Preview — the rendered thumbnail, generated from the stored example values
Scroll through the sections to get a feel for what JasperWho? extracts from a .jrxml file automatically on upload.
Step 3 — Render a Report from the Frontend
From within a Report Config, click the Generate PDF button. A dialog opens with pre-filled parameter values (taken from the example values stored on the config). You can edit any of them before rendering.
Select an output type — Base64 is fine for a quick look — and click Generate PDF. JasperWho? processes the request and shows the resulting PDF inline within seconds. No API call needed, no setup required.
Step 4 — Check the History Record
Navigate to Report History Records. Your render from Step 3 appears at the top of the list (if you left createHistoryRecord enabled in the dialog). Open it to see the full log: the exact request payload, the API response, the rendered PDF, and a thumbnail.
From here you can download the PDF directly or trigger a reprint — which creates a new Print Task.
Try It Yourself
Once you have completed the tour, these are good next things to explore on your own.
Upload Your Own Template
If you have a .jrxml file designed in Jaspersoft Studio, you can upload it directly to the demo. Go to Report Configs → Create, attach the file, and let JasperWho? analyse it. Within seconds, all parameters, fields, and resources are detected and listed automatically.
After upload, set any missing example values, upload resource files if needed, and click Generate Preview to produce a thumbnail. The report is then ready to render.
Call the API Directly
The demo account has API access enabled. To get a token, open the user menu in the top right corner and go to Account Settings → API Tokens — copy it immediately, it is only shown once.
With the token in hand, render any report with a single HTTP request:
curl -X POST \
  https://demo.jasper-who.kiwi-software.dev/api/v1/report-config/{reportName}/render \
  -H "Authorization: Bearer <your-token>" \
  -H "Content-Type: application/json" \
  -d '{
    "outputType": "base64",
    "useExampleValues": true,
    "createHistoryRecord": true
  }'
Replace {reportName} with the report_name of any config from the list (visible in the detail view). The useExampleValues flag tells JasperWho? to use the stored example values instead of requiring you to pass parameters and data manually — ideal for a first test.
The response contains the rendered PDF as a Base64 string and a trace ID you can look up in History Records.
Explore Print Tasks
When rendering via the frontend or API, enable the print task option and provide any printer name (e.g. demo-printer). JasperWho? creates a ReportPrintTask record with status pending. Since no print service is connected to the demo, the task stays pending — but you can inspect the full record and see how status tracking works. Completed print tasks are purged automatically after a configurable retention period.
Demo Limitations
| What | Behaviour in the demo |
|---|---|
| Print tasks | Created and traceable, but no real printer connected — tasks remain pending. Completed tasks are purged automatically. |
| Live SQL connections | Connection Configs can be created and tested, but no external databases are reachable from the demo environment. |
| User management | The demo account does not have admin rights — user accounts and permissions cannot be managed. |
| Data persistence | Uploaded templates, history records, and other data may be reset periodically. |
Open Source Attribution
JasperWho? and its companion Background Printing Service are built on open source software. We are grateful to the authors and contributors of the following packages.
JasperWho?
| Package | License | Description |
|---|---|---|
| laravel/framework | MIT | The Laravel PHP framework — routing, ORM, queues, and the application foundation. |
| laravel/reverb | MIT | First-party Laravel WebSocket server — used to broadcast print task events in real time. |
| laravel/sanctum | MIT | API token authentication for the JasperWho? REST API. |
| laravel/tinker | MIT | REPL for the Laravel application. |
| livewire/livewire | MIT | Full-stack component framework for the JasperWho? frontend. |
| opcodesio/log-viewer | MIT | In-browser Laravel log viewer. |
| knuckleswtf/scribe | MIT | Automatic API documentation generator. |
| quilhasoft/jasperphp | MIT | Pure-PHP JasperReports renderer — the engine that compiles .jrxml templates and produces PDFs without a Java runtime. |
Background Printing Service
| Package | License | Description |
|---|---|---|
| PdfiumViewer | Apache 2.0 | .NET wrapper around the PDFium library — used to render and send PDFs to Windows printers. |
| PDFium | BSD 3-Clause | Google's PDF rendering engine, bundled as a native binary via PdfiumViewer.Native.x86_64.v8-xfa. |
| RestSharp | Apache 2.0 | HTTP client library for all API communication with JasperWho?. |
| Newtonsoft.Json | MIT | JSON serialisation and deserialisation for API responses and WebSocket messages. |
| Serilog | Apache 2.0 | Structured logging to console and rolling file (Serilog.Sinks.Console, Serilog.Sinks.File). |
Get JasperWho?
Interested in using JasperWho? in your own environment? Get in touch — we'll figure out the right setup together.
Contact
| Name | Benjamin Fischer |
| bfischer@kiwi-software.dev | |
| Website | www.kiwi-software.dev |
What to Expect
Drop a short message explaining your use case — what you need to generate, how often, and whether you'd prefer self-hosted or managed. You'll hear back within one business day.
If you want to explore the product first, the live demo is open at demo.jasper-who.kiwi-software.dev — login: demo@jasper.who · password: demo.